Seafood Salad

Seafood Salad

Seafood Salad

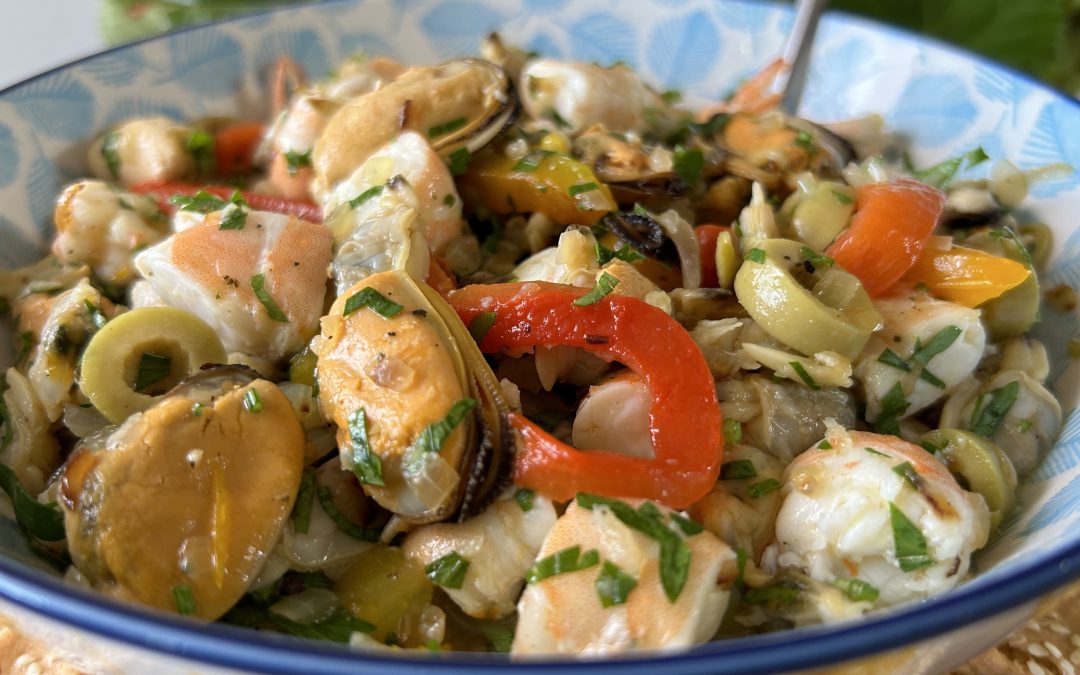
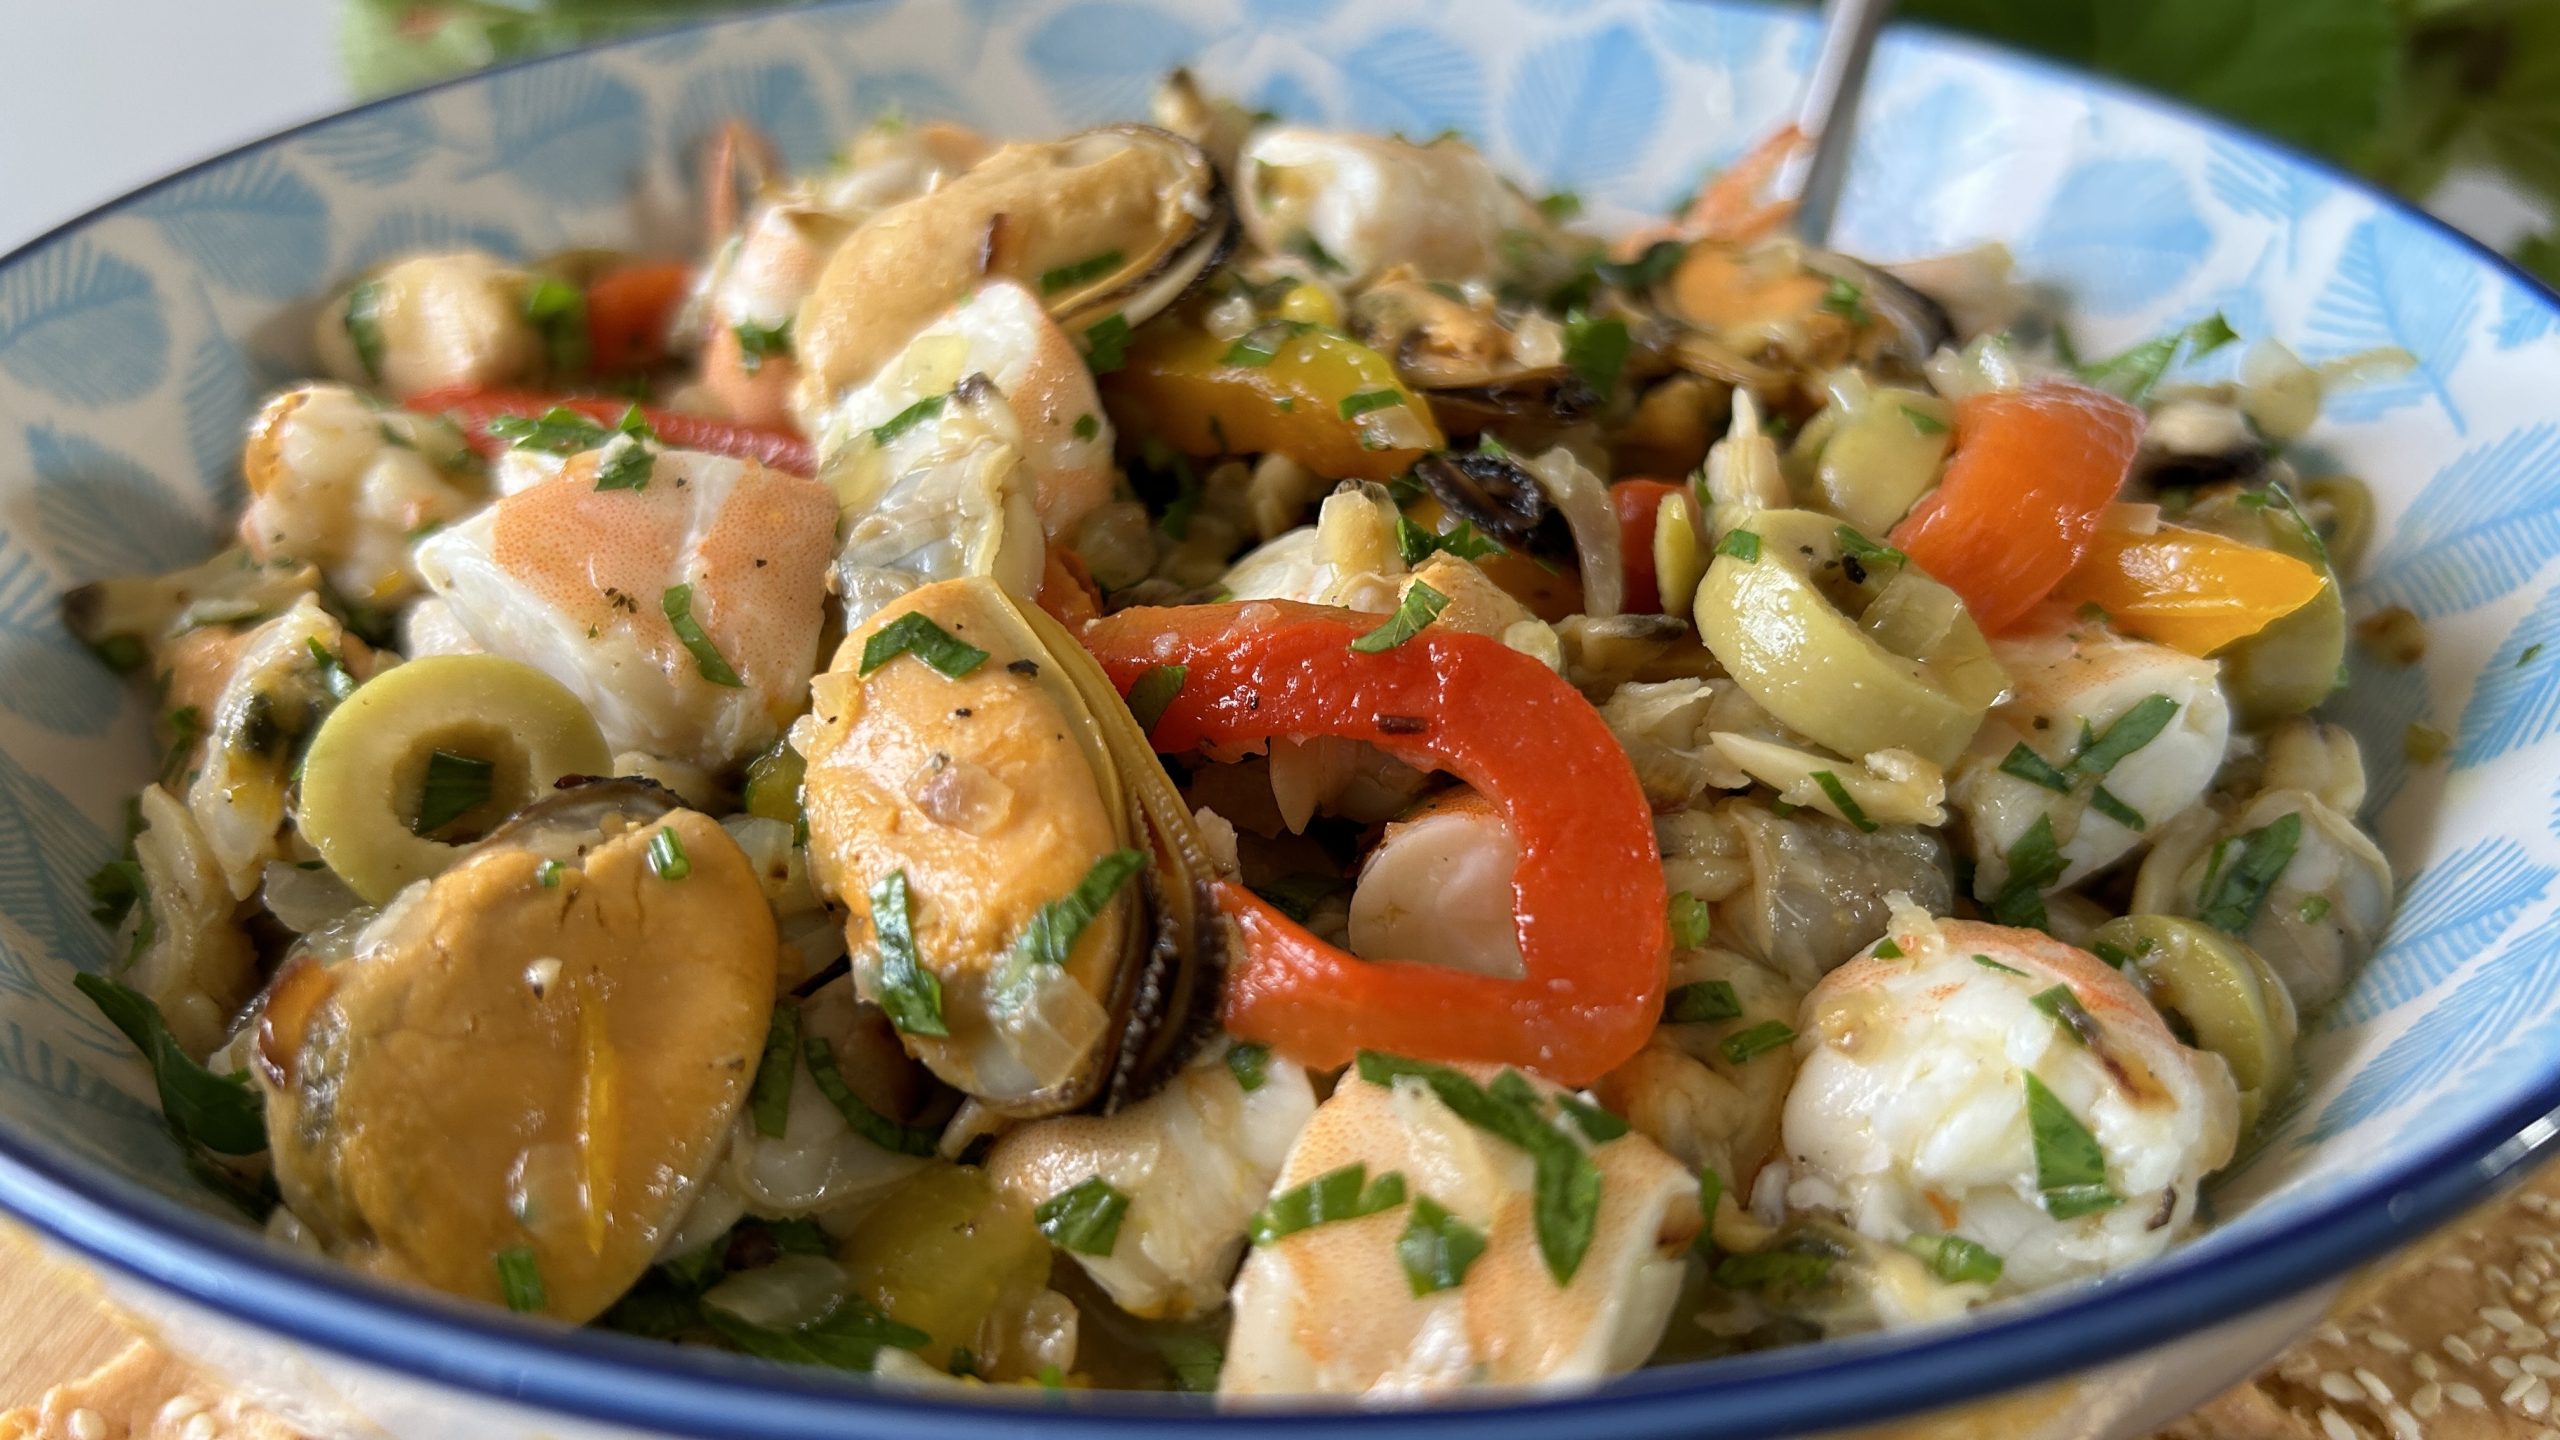
If you’re looking for a way to boost your iron intake while enjoying a delicious, nutrient-packed meal, this iron-rich seafood salad is a perfect addition to your table. Featuring clams and mussels as the main ingredients, this dish not only brings a burst of flavor but also offers a powerhouse of essential nutrients. Clams and mussels are among the best dietary sources of heme iron, the form of iron that your body can absorb most efficiently. For individuals managing iron deficiency or anyone simply wanting to maintain healthy iron levels, adding these shellfish to your diet can be an excellent way to naturally replenish iron stores. Unlike plant-based sources of iron, which are more difficult for your body to absorb due to the presence of inhibitors like phytates, clams and mussels provide a more direct and effective source of iron.

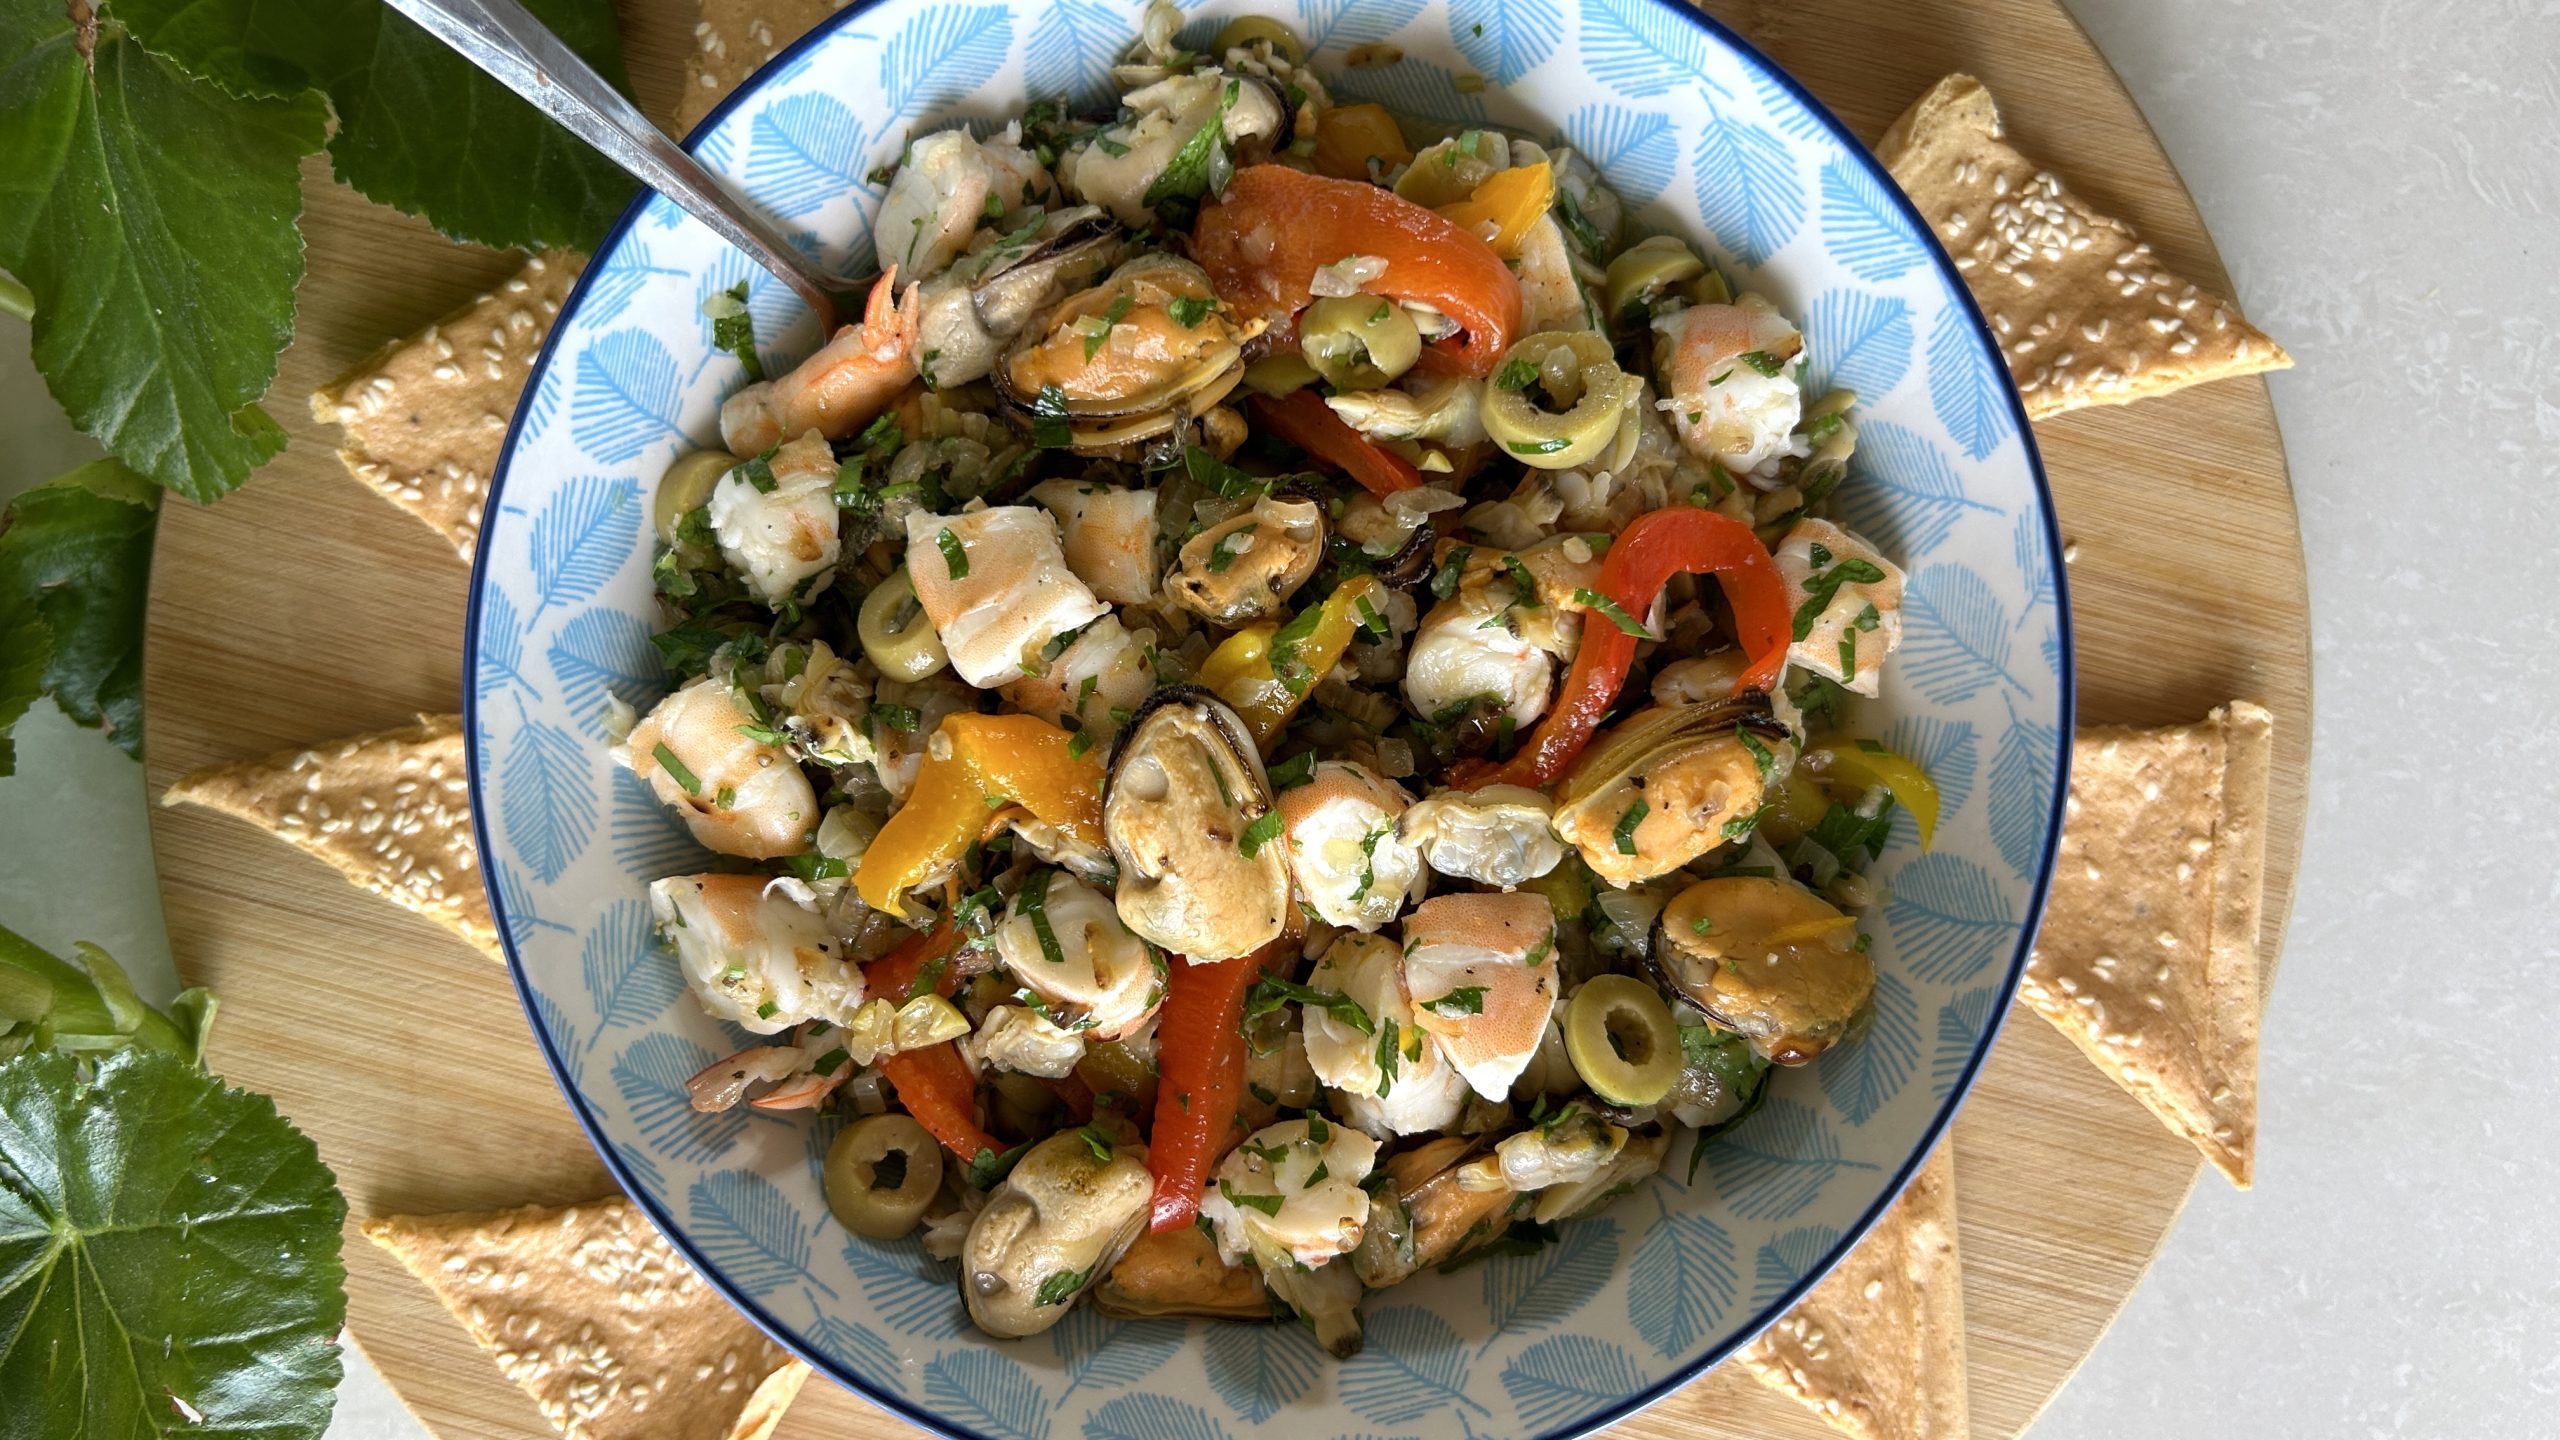
Clams and mussels are more than just iron providers; they’re also rich in a variety of nutrients that support your overall well-being. They’re packed with high-quality protein, essential for muscle maintenance and repair, and they’re a fantastic source of vitamin B12, which is crucial for brain function and energy production. Additionally, these shellfish contain healthy omega-3 fatty acids, which support heart health, reduce inflammation, and promote brain health. Whether you’re recovering from anemia or just looking for a satisfying, nutritious meal, this seafood salad can help you meet your body’s needs while treating your taste buds.

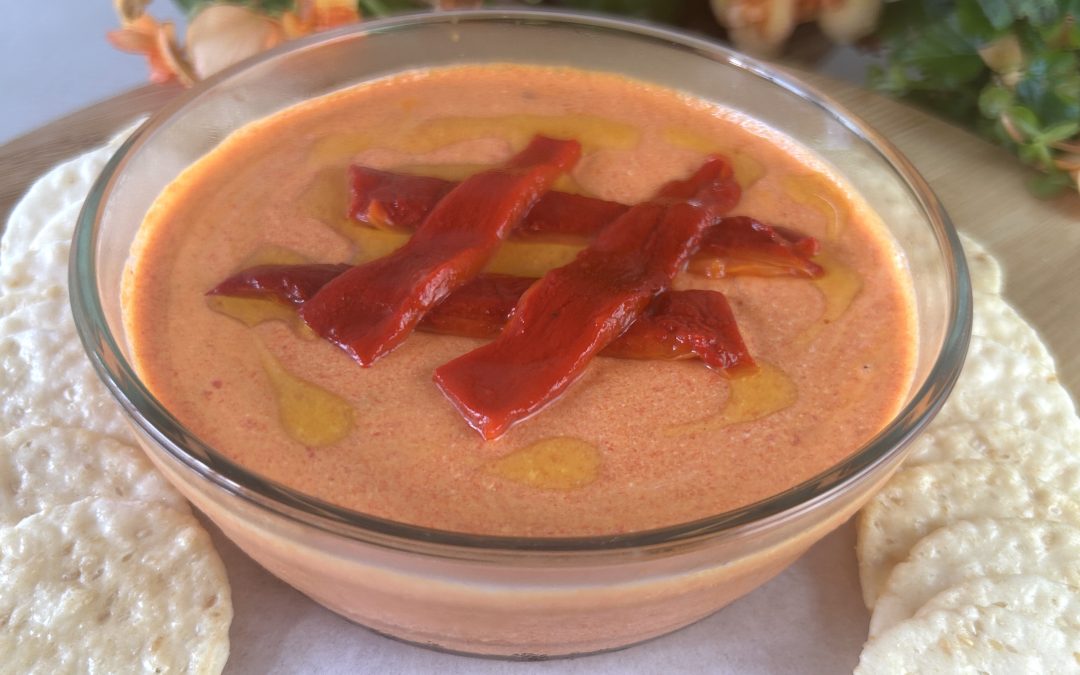
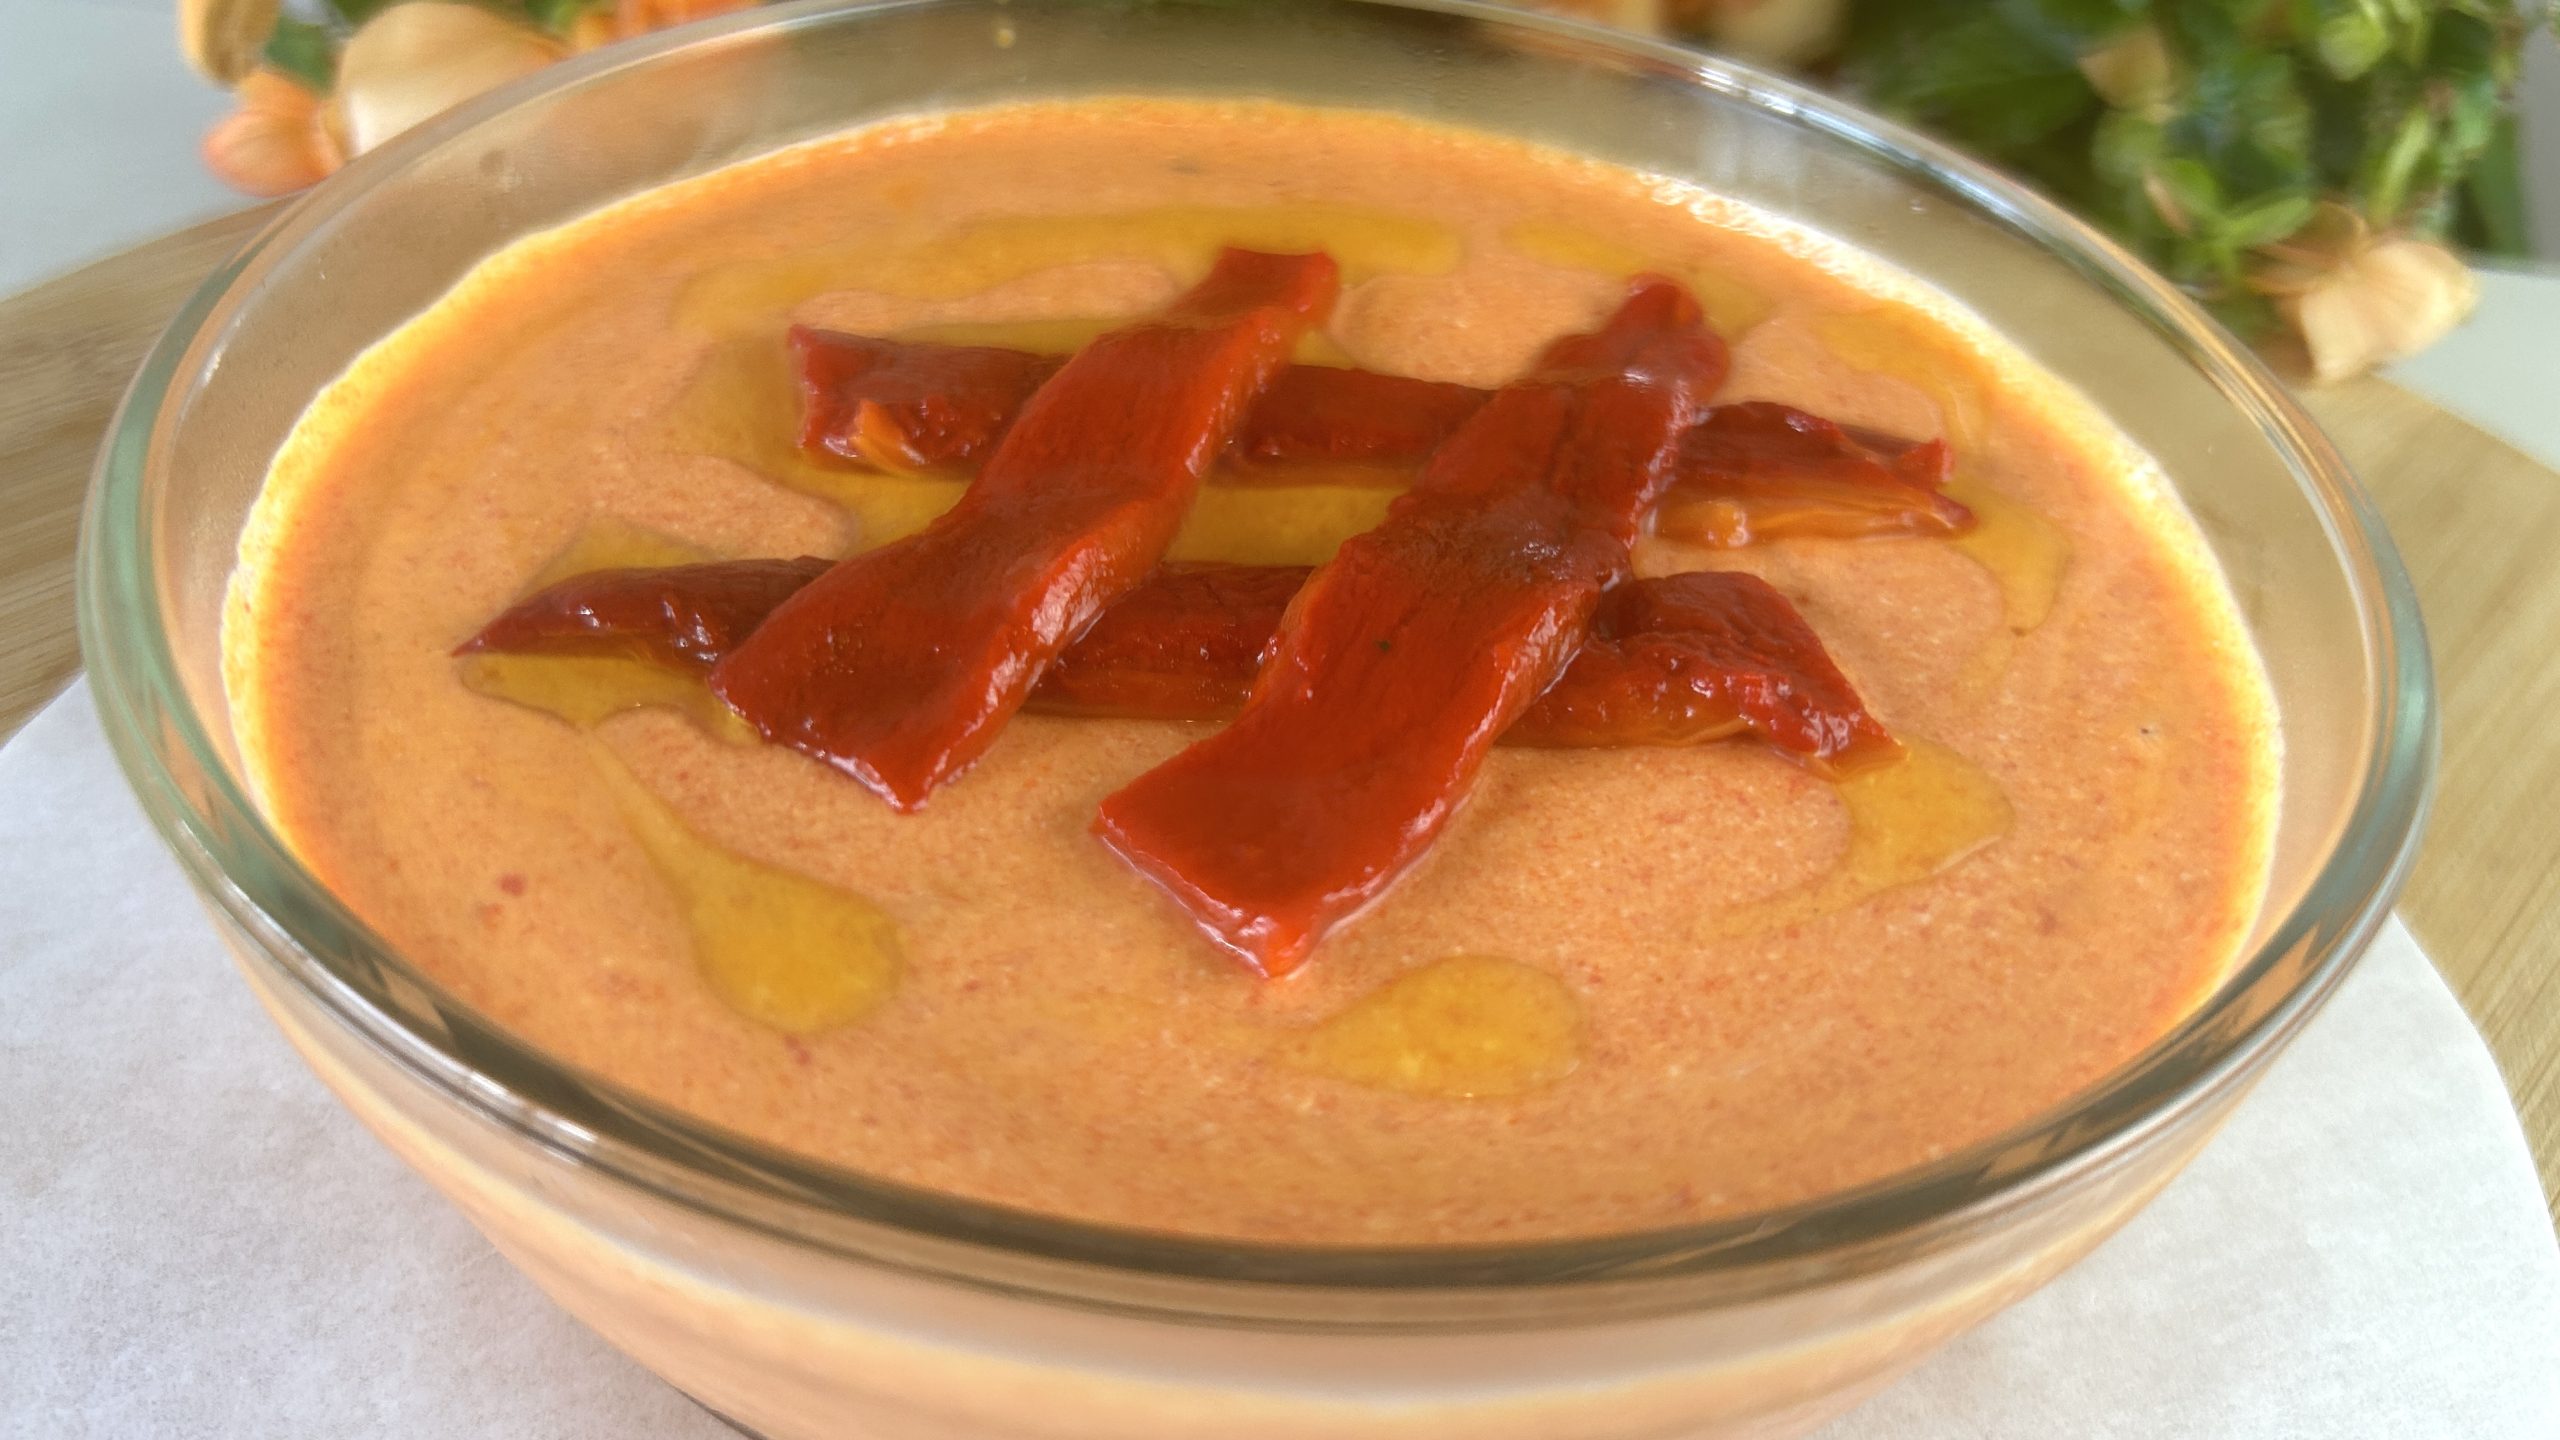
One of the best things about this salad is its versatility. You can serve it as a refreshing appetizer or a light, flavorful main course, making it suitable for various occasions. The combination of seafood with crisp, broiled bell peppers and a zesty lemon dressing makes this dish as exciting as it is nutritious. With its high iron content and wealth of other essential vitamins and minerals, it’s a dish you’ll want to include in your regular meal rotation, especially if you’re aiming to boost your energy levels, improve focus, and support your body’s immune system.

Incorporating clams, mussels, and shrimp into your diet isn’t just about iron. These seafood options are also low in fat, but rich in healthy fats that are known to improve cardiovascular health. With a salad like this, you’re not only filling your plate with delicious flavors, but you’re also promoting long-term health. Regularly consuming shellfish like clams and mussels has been shown to reduce the risk of cardiovascular diseases and improve cognitive function. So why not indulge in this vibrant seafood salad and enjoy the many benefits it has to offer?

Ingredients

  • 100 g onion
  • 4 tbsp olive oil (1 tbsp for sautéing onion, 3 tbsp. for the salad seasoning)
  • ⅛ tsp. + ¼ tsp salt
  • 2 garlic cloves
  • 270 g bell peppers
  • 20 g fresh parsley
  • 1 cup (120 g) clam meat, frozen or fresh
  • 1 cup (175 g) mussel meat, frozen or fresh
  • 140 g shrimp chunks, frozen or fresh
  • 45 g sliced olives
  • Juice of 1 lemon
  • 1 tbsp. apple cider vinegar
  • Black pepper, to taste

Directions

  1. Sauté chopped onion in olive oil with a pinch of salt until browned.
  2. Add minced garlic to the onions, cook briefly, then set aside.
  3. Broil oiled bell peppers at 400°F (200°C) for 15 minutes.
  4. Once cooled, peel the peppers and cut into strips.
  5. Defrost or cook clam and mussel meat, then set aside.
  6. Cook the shrimp, peel, and chop into small chunks.
  7. In a large bowl, combine the onions, peppers, clams, mussels, shrimp, olives, and parsley.
  8. Dress with olive oil, lemon juice, vinegar, salt, and pepper. Mix well and serve.

Prep Time: 30 minutes

Broil Time: 15 minutes

Servings: 4 servings

Nutritional Information (per serving):

  • Energy: 323 calories
  • Protein: 27.7 g
  • Fat: 18.14 g
  • Carbohydrates: 12.04 g
  • Fiber: 2.2 g
  • Iron: 5 mg

Storage

  • Store any leftovers in an airtight container in the refrigerator for up to 2 days.
  • Best served fresh for optimal flavor and texture.
  • If using fresh seafood, be sure to consume within the recommended time for freshness.

Notes

  • This dish is gluten-free.
  • Rich in heme iron, making it ideal for those managing iron deficiency.
  • For best results, serve fresh and enjoy within two days of preparation.
Red Pepper Dip

Red Pepper Dip

Red Pepper Dip

Spice up your snack time with this vibrant and flavorful Red Pepper Dip! This recipe combines the smoky sweetness of roasted red peppers with the creamy richness of cottage cheese, creating a dip that’s both satisfying and healthy. Cottage cheese, a protein-rich, low-calorie ingredient, ensures that this dip not only tastes great but also provides essential nutrients without the guilt.

Red peppers are the highlight of this dish, offering a wealth of health benefits. They are packed with vitamins A and C, antioxidants, and fiber, making them a great addition to your diet. The roasting process enhances their natural sweetness, adding depth and complexity to the dip. Cottage cheese, on the other hand, brings in a creamy texture and a boost of protein, which is essential for muscle repair and overall health. Including red peppers and cottage cheese in your regular diet can support your immune system, improve skin health, and provide lasting energy.

This Red Pepper Dip is perfect for adding a burst of color and flavor to any dish. Use it as a spread on sandwiches, as a topping for grilled meats, or as a flavorful dip for your favorite snacks. Enjoy the blend of smoky and sweet flavors in every bite!

Ingredients

  • 3 large red peppers (400 g)
  • 3 ½ tbsp. olive oil
  • 1 cup (200 g) cottage cheese
  • 1 garlic clove
  • ¼ tsp. salt
  • ½ tsp. smoked paprika
  • Chili flakes to taste
  • 1 tbsp. lemon juice

Directions

  1. Clean and pat dry the red peppers. Brush the red peppers with some olive oil.
  2. Place the red peppers on a baking sheet and broil for 10 to 15 minutes or until the skin looks dark and roasted on one side.
  3. Flip the red peppers and broil the other side for another 10 to 15 minutes.
  4. Transfer the hot roasted peppers into a bowl and cover with plastic wrap. Let sit for 30 minutes to cool slightly and make the skin easier to remove.
  5. Once cooled, peel off the skin and remove the seeds from the peppers. Set the cleaned red pepper flesh aside to continue cooling.
  6. In a mixing bowl, add the cottage cheese and blend it until smooth and creamy.
  7. Add the red pepper flesh to the blended cottage cheese, olive oil, garlic, salt, smoked paprika, chili flakes, and lemon juice to the mixture.
  8. Blend again until you reach a smooth consistency.
  9. Transfer the dip into a glass container and let sit in the fridge for at least 1 hour to thicken and allow the flavors to infuse.
  10. Garnish with slices of roasted red pepper and drizzle with some extra olive oil on top before serving.

Prep Time: 20 minutes
Broiling Time: 30 minutes
Fridge Time: 1 hour
Servings: 6

Nutritional Information (Per Serving)

  • Energy: 131 calories
  • Protein: 5.02 g
  • Fat: 9.64 g
  • Carbohydrates: 7.45 g
  • Fiber: 1.1 g

Storage

  • Store the leftover red pepper dip in an airtight container in the refrigerator. It will stay fresh for up to 5 days.
  • This dip pairs wonderfully with a variety of crackers, toasted bread, or fresh vegetables. It also works as a spread on sandwiches or wraps.


Spinach Dip

Spinach Dip

Spinach Dip

Get ready to enjoy a light and flavorful twist on the classic spinach dip! This version swaps out the traditional sour cream and mayonnaise for cottage cheese, making it a protein-packed, low-calorie, and delectable alternative. Perfect for any occasion, this dip offers a creamy texture and a burst of flavor that will surely make it a hit at your next gathering.

Spinach is not just a leafy green; it’s a nutritional powerhouse. Rich in iron, vitamins A and C, and several antioxidants, spinach provides essential nutrients that support eye health, reduce oxidative stress, and may even help regulate blood pressure. When combined with cottage cheese, which is high in protein and calcium, this dip becomes a nutritious option that you can enjoy guilt-free. Incorporating spinach and cottage cheese into your regular diet can help boost your overall health, support muscle repair, and maintain strong bones.

Whether you’re serving it as a side dish, appetizer, or a spread on sandwiches, this spinach dip is a versatile addition to any meal. With its combination of nutrient-dense spinach and creamy cottage cheese, this dip is not only delicious but also a great way to add more greens and protein to your diet.

Ingredients

  • 1 medium-sized onion (100 g)
  • 3 tbsp. olive oil
  • ¼ tsp. salt
  • 200 g defrosted spinach (or equivalent of fresh spinach)
  • 1 large garlic clove
  • 1 tsp. dried dill
  • Black pepper to taste
  • Chili flakes (to taste, optional)
  • 1 cup cottage cheese (200 g)
  • 60 g Parmesan cheese
  • 1 tbsp. lemon juice
  • Fresh spinach leaves (for garnish)
  • 1 tbsp. extra olive oil (for garnish, optional)

Directions

  1. Finely chop the medium-sized onion. In a pan over medium-high heat, add olive oil, the chopped onion, and salt. Stir and cook for 2-3 minutes or until the onion starts to brown.
  2. Add the defrosted or fresh spinach to the pan with the onions. Add a minced garlic clove, dried dill, black pepper to taste, and chili flakes to taste. Continue to stir and sauté all the ingredients.
  3. Continue sautéing for 8-10 minutes. Set the cooked spinach mixture aside to cool.
  4. In a large mixing bowl, add the cottage cheese and blend until smooth and creamy.
  5. Add ¾ of the cooked spinach mixture, olive oil, Parmesan cheese, and lemon juice to the blended cottage cheese. Blend until you reach a smooth consistency.
  6. Add the remaining cooked spinach mixture to the blended dip and stir to incorporate the larger pieces of spinach for texture.
  7. Refrigerate for at least 1 hour to thicken and allow the flavors to infuse.
  8. Before serving, garnish with fresh spinach leaves and a drizzle of extra olive oil on top.
  9. Serve with your favorite crackers or as a side dish or appetizer.

Prep Time: 20 minutes
Pan Cooking Time: 15 minutes
Fridge Time: 1 hour
Servings: 6

Nutritional Information (Per Serving)

  • Energy: 173 calories
  • Protein: 8.04 g
  • Fat: 13.48 g
  • Carbohydrates: 5.99 g
  • Fiber: 1.2 g

Storage

  • Store the leftover spinach dip in an airtight container in the refrigerator. It will stay fresh for up to 5 days.
  • This dip pairs wonderfully with a variety of crackers, toasted bread, or fresh vegetables. It also works as a spread on sandwiches or wraps.

Additional Recommendations

  •  This spinach dip is a delightful and nutritious option for any occasion.
  • Enjoy it as a party appetizer, a healthy snack, or even as a spread on sandwiches or wraps for a quick and easy meal.

Eggplant Dip

Eggplant Dip

Eggplant Dip

Welcome to a fresh twist on a classic dip! In this recipe, we’re taking a beloved Middle Eastern dish, baba ghanoush, and adding a modern twist by incorporating cottage cheese. Cottage cheese is a powerhouse ingredient that’s making waves in the culinary world due to its impressive nutritional profile. It’s low in calories, packed with protein, and incredibly versatile, perfect for creating a creamy and satisfying dip like this one.

Eggplants are the star of this dish, bringing their smoky, rich flavor that’s perfectly complemented by the smooth and slightly tangy cottage cheese. Not only is this dip delicious, but it’s also packed with nutritional benefits. Eggplants are a great source of dietary fiber, which supports digestion, and they are rich in antioxidants, particularly nasunin found in the skin, which protects cells from damage. Cottage cheese adds a boost of protein, making this dip not just a tasty treat but also a nourishing addition to your diet.

Including eggplant and cottage cheese in your regular diet can have multiple health benefits. Eggplants are low in calories but high in vitamins and minerals like vitamin C, vitamin K, and potassium. They can help with weight management, heart health, and even blood sugar control. Cottage cheese, with its high protein content, supports muscle repair and growth, making this dip a fantastic post-workout snack or a wholesome addition to your meals.

Ingredients

  • 2 medium-sized eggplants (450 g)
  • 1 cup cottage cheese (200 g)
  • 2 tbsp. olive oil
  • 1 ½ tbsp. extra olive oil, for brushing and drizzling
  • ½ tsp. salt
  • ¼ tsp. cumin
  • ¼ tsp. smoked paprika
  • Black pepper, to taste
  • 1 tbsp. lemon juice
  • 20 g fresh parsley
  • Parsley leaves for garnish

Directions

  1. Clean and pat dry the eggplants. If desired, prick them with a fork or make small cuts with a knife to accelerate the roasting process. Brush the eggplants with olive oil.
  2. Preheat the broiler to 350°F (175°C). Place the eggplants on a baking sheet and broil for 10-15 minutes on one side.
  3. Flip the eggplants, and broil for another 10-15 minutes. If necessary, continue broiling back and forth until the eggplants are tender and well-cooked through.
  4. Let the eggplants cool down. Remove the heads and peel off the tender dark skin. Transfer to a plate and set aside.
  5. In a large mixing bowl, add cottage cheese and blend it until smooth and creamy.
  6. Add the eggplant flesh to the blended cottage cheese, olive oil, salt, cumin, smoked paprika, black pepper to taste, lemon juice, and fresh parsley.
  7. Blend again until the mixture reaches a smooth consistency similar to that of baba ghanoush.
  8. Transfer into a glass container. Let it sit in the fridge for at least 1 hour to thicken.
  9. Garnish with fresh parsley leaves and drizzle some extra olive oil.

Prep Time: 20 minutes
Baking Time: 30 minutes
Fridge Time: 1 hour
Servings: 6

Nutritional Information (Per Serving)

  • Energy: 123 calories
  • Protein: 4.58 g
  • Fat: 9.52 g
  • Carbohydrates: 6.01 g
  • Fiber: 2.4 g

Storage

  • Store the leftover baba ghanoush in an airtight container in the refrigerator for up to 5 days.
  • Serve chilled with your favorite crackers, pita bread, or as a side dish.

Additional Recommendations

This dip pairs wonderfully with fresh vegetables, making it a perfect addition to any gathering or meal. It’s also great as a spread for sandwiches, adding a creamy texture and a boost of flavor. Enjoy it as a wholesome snack or as part of a balanced meal!

Mediterranean Salad

Mediterranean Salad

Mediterranean Salad

Mediterranean cuisine is celebrated for its vibrant flavors, fresh ingredients, and wholesome nutrition, and this Mediterranean salad is a true reflection of that tradition. This dish offers a delightful balance of textures and tastes, making it an ideal choice for a refreshing and satisfying meal. The salad combines the crispness of fresh vegetables with the tenderness of steamed potatoes, carrots, and green peas, creating a harmony of flavors that is both nourishing and delicious.

What makes this salad truly special is its versatility. Whether you’re looking for a light lunch, a side dish for dinner, or a nutritious option for meal prep, this salad fits the bill. The addition of protein-rich ingredients like boiled eggs and tuna not only enhances the nutritional profile but also makes the salad more filling, perfect for those who want a complete meal in one bowl. The creamy homemade vinaigrette, made with tahini or mayonnaise, olive oil, and apple cider vinegar, ties all the ingredients together, providing a tangy and rich flavor that complements the fresh and cooked components beautifully.

Moreover, this Mediterranean salad is highly customizable. You can easily adjust the ingredients to suit your taste preferences or dietary needs. Add more veggies, swap out the tuna for chickpeas or grilled chicken, or experiment with different herbs and spices to make this salad your own.

It’s a versatile dish that can be enjoyed year-round, whether you’re looking to cool down on a hot summer day or want a colorful addition to your winter meal rotation. With its blend of flavors, textures, and nutrients, this Mediterranean salad is sure to become a favorite in your kitchen.

Ingredients

For the salad part:

  • 200 g potato (steamed)
  • 100 g carrot (steamed)
  • 100 g green peas (steamed)
  • 90 g red pepper
  • 90 g cherry tomatoes
  • 30 g green onion
  • 35 g pickles
  • 2 boiled eggs
  • 1 can tuna (160 g, drained)

For the vinaigrette:

  • 1/3 cup tahini sauce or a healthy mayonnaise of your choice
  • 2 tbsp. extra virgin olive oil
  • 2 tbsp. apple cider vinegar
  • 1 tsp salt
  • Black pepper to taste
  • 10 parsley leaves for garnish (optional)

Directions

  1. Clean and chop the potato and carrot into small pieces.
  2. Transfer to a steamer and add frozen green peas.
  3. Steam for 15 minutes or until tender.
  4. Allow the veggies to cool before transferring them to a mixing bowl.
  5. Dice the tomato, red pepper, green onion, and pickles into small pieces. Set aside.
  6. Boil 2 eggs, peel, and chop into small pieces.
  7. Drain the can of tuna from its water and set aside.
  8. In a small bowl, mix tahini or mayonnaise, extra virgin olive oil, apple cider vinegar, salt, and black pepper.
  9. Stir until well combined.
  10. In a large mixing bowl, add the cooled, cooked veggies, diced fresh veggies, boiled eggs, and tuna.
  11. Pour the vinaigrette over the salad.
  12. Using a spoon or salad tongs, gently toss the salad until all ingredients are well coated with the vinaigrette and evenly distributed.
  13. Transfer the salad to a serving plate. Garnish with some fresh parsley leaves.
  14. Serve and enjoy fresh.

Prep Time:  30 minutes

Servings: 4

Nutrition (Per 1 Serving)

  • Energy: 290 calories
  • Protein: 14.33 g
  • Fat: 17.83 g
  • Carbohydrates: 18.86 g
  • Fiber: 3.9 g

Notes

  • Store leftovers in an airtight container in the fridge for up to 2 days. Yet, it is recommended to consume the salad while fresh.
  • Customize your salad by adding your favorite vegetables, seasoning, and herbs.
  • Enjoy this dish on hot days or anytime of the year.