Potato Pizza

Potato Pizza

Potato Pizza

Craving pizza but trying to avoid the carbs from traditional flour crusts? This Potato Pizza is your perfect solution! By using potatoes as the base, you not only cut down on carbs but also gain a range of nutritional benefits. Potatoes are packed with essential nutrients such as vitamins C and B6, potassium, and fiber. They support a healthy immune system, promote heart health, and can help regulate blood pressure. The fiber content in potatoes aids in digestion and helps keep you full longer, which is great for maintaining a healthy weight. Additionally, potatoes are a good source of antioxidants, which help fight off free radicals in the body, contributing to overall health.

Including potatoes in your diet can also provide sustained energy, making them an excellent choice for active individuals. This Potato Pizza is not only delicious but also a smart choice for anyone looking to maintain a balanced diet without sacrificing flavor.

Let’s dive into this incredibly tasty recipe that’s sure to satisfy your pizza cravings while keeping things light and healthy!

Ingredients:

  • 300 g small-sized white potato or any potato of your choice (12 small potatoes)
  • 100 g fresh mozzarella cheese or any cheese of your choice
  • 2 garlic cloves
  • 2 tbsp. olive oil
  • ¼ cup tomato paste
  • ½ tsp. pizza seasoning powder (homemade or store-bought)
  • ~1 tbsp. water
  • Salt to taste

Directions:

  1. Place the small white potatoes in a pot and boil them for about 20 minutes or until they get tender.
  2. Once cooked, drain them and gently smash them with a hand potato masher until they flatten.
  3. Drizzle the potatoes with olive oil infused with garlic and sprinkle some salt to taste.
  4. Place the potatoes on a baking pan and bake them for approximately 25 minutes at 400°F or until they become crispy and golden brown.
  5. Once the potatoes are baked, remove them from the oven and spread pizza tomato sauce over each potato, ensuring even coverage.
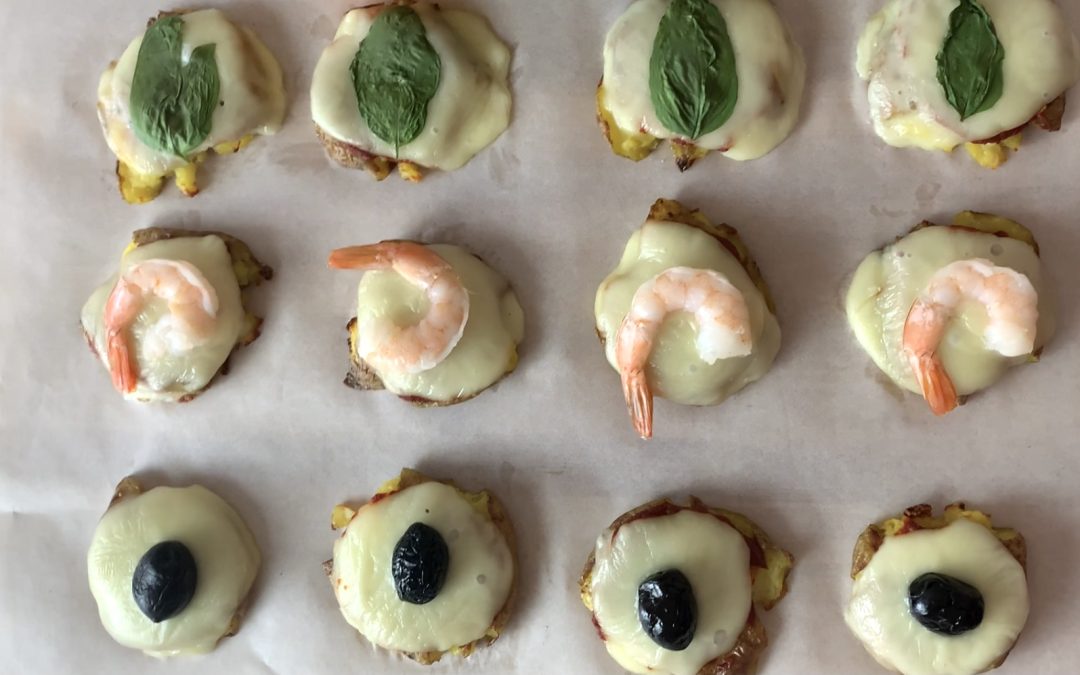
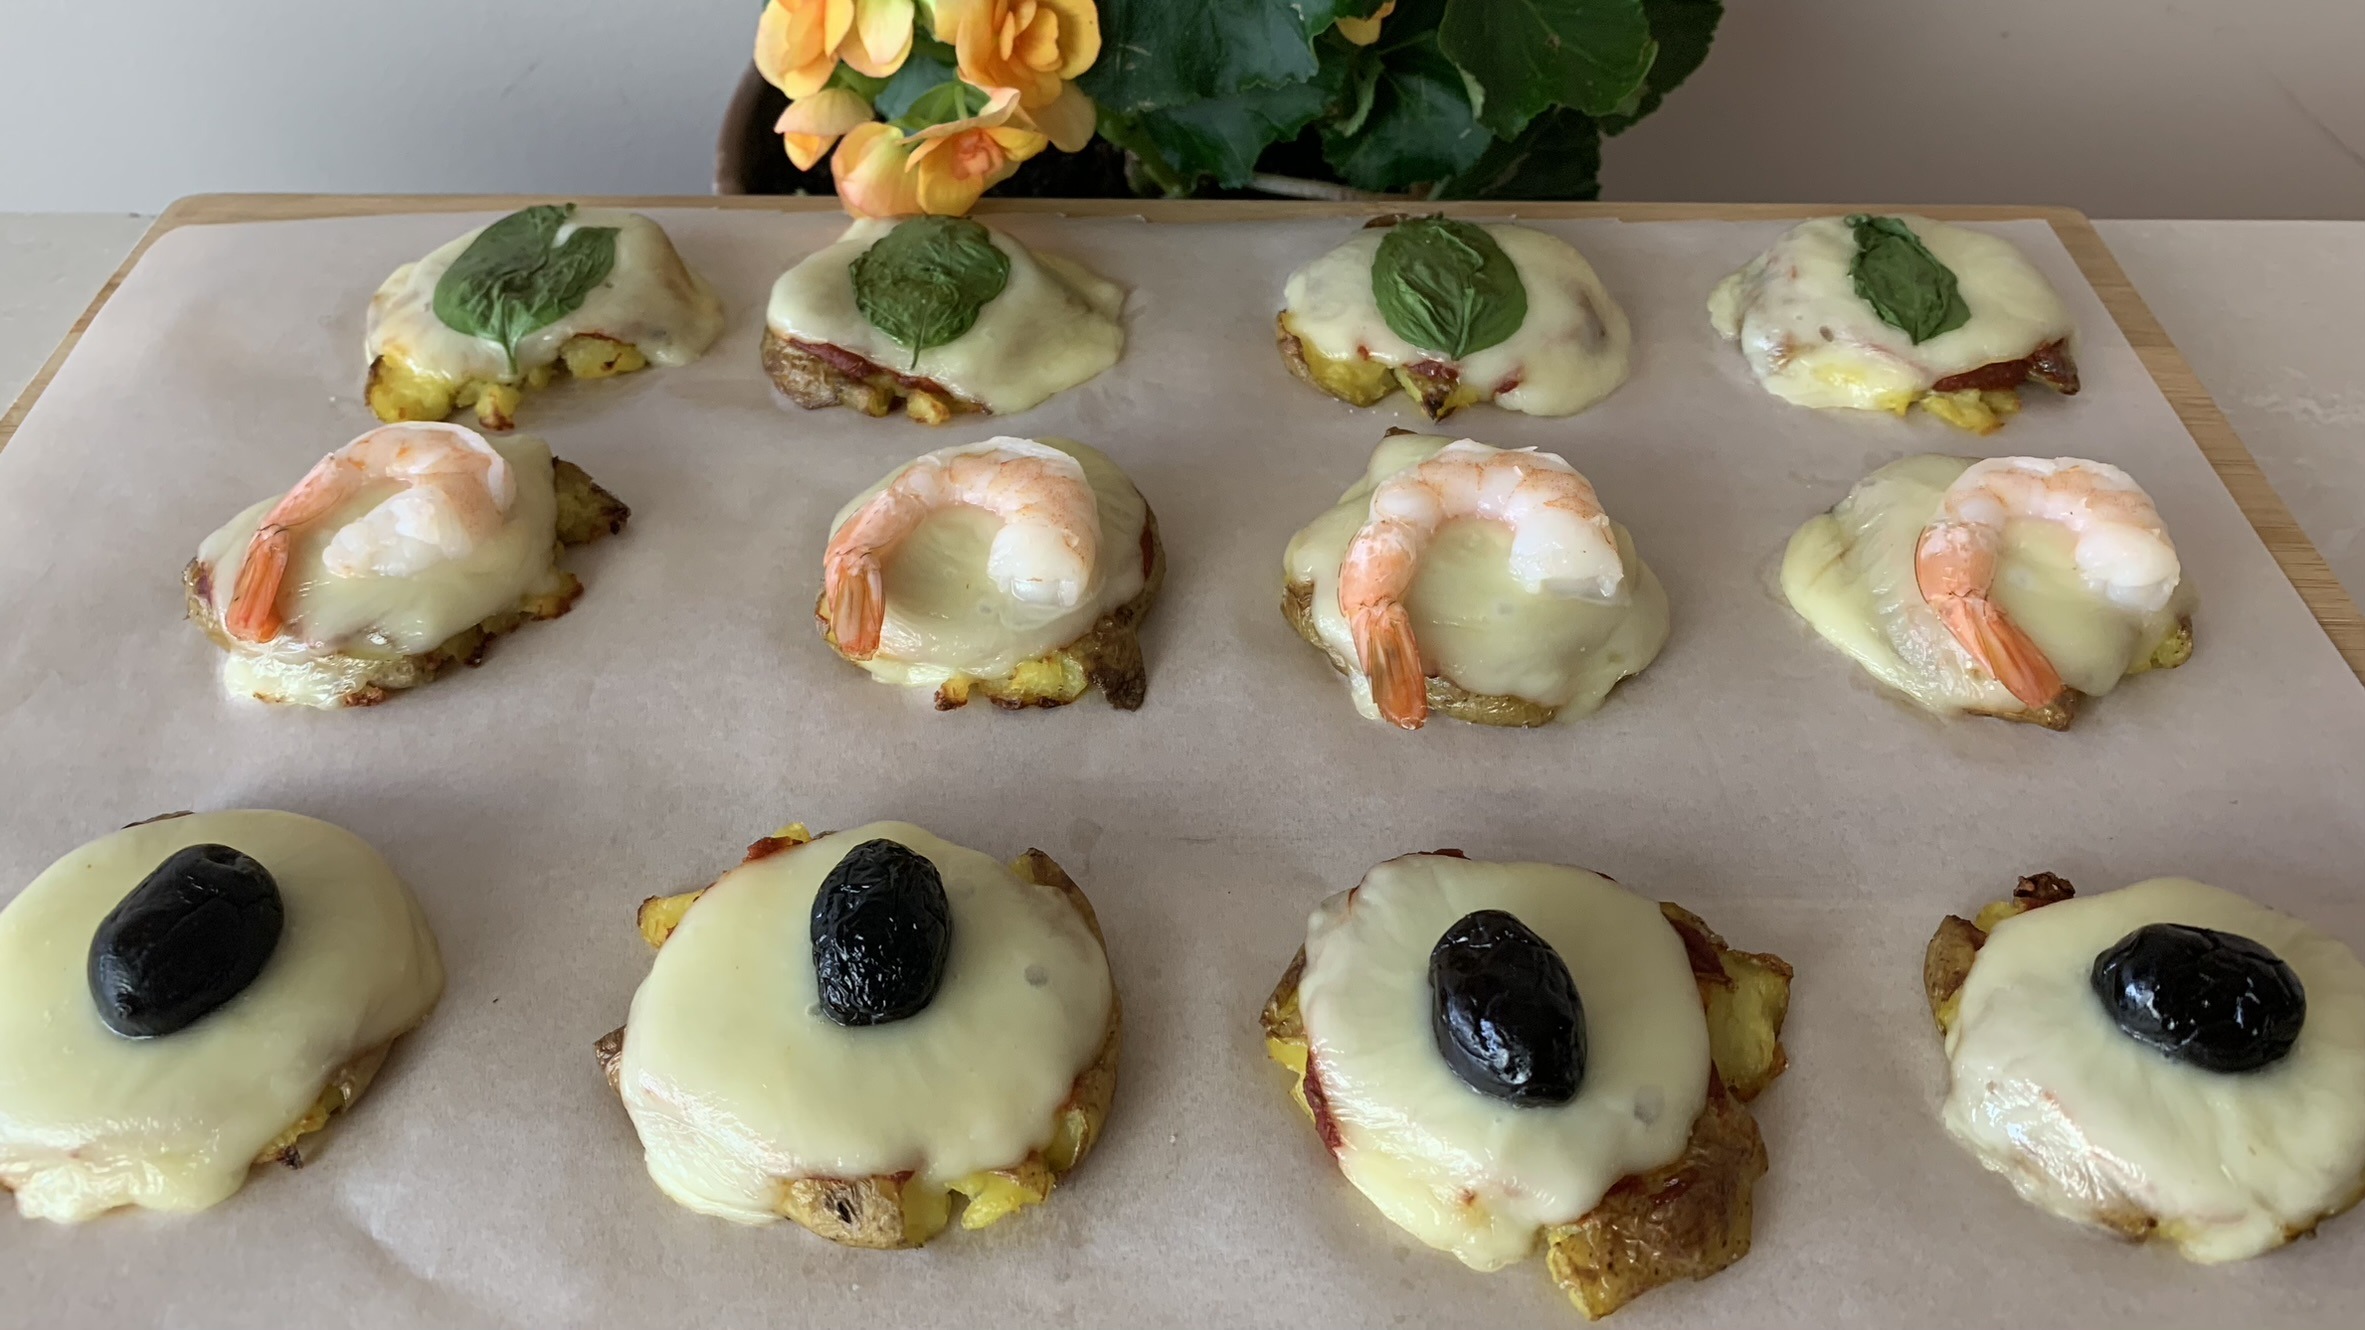
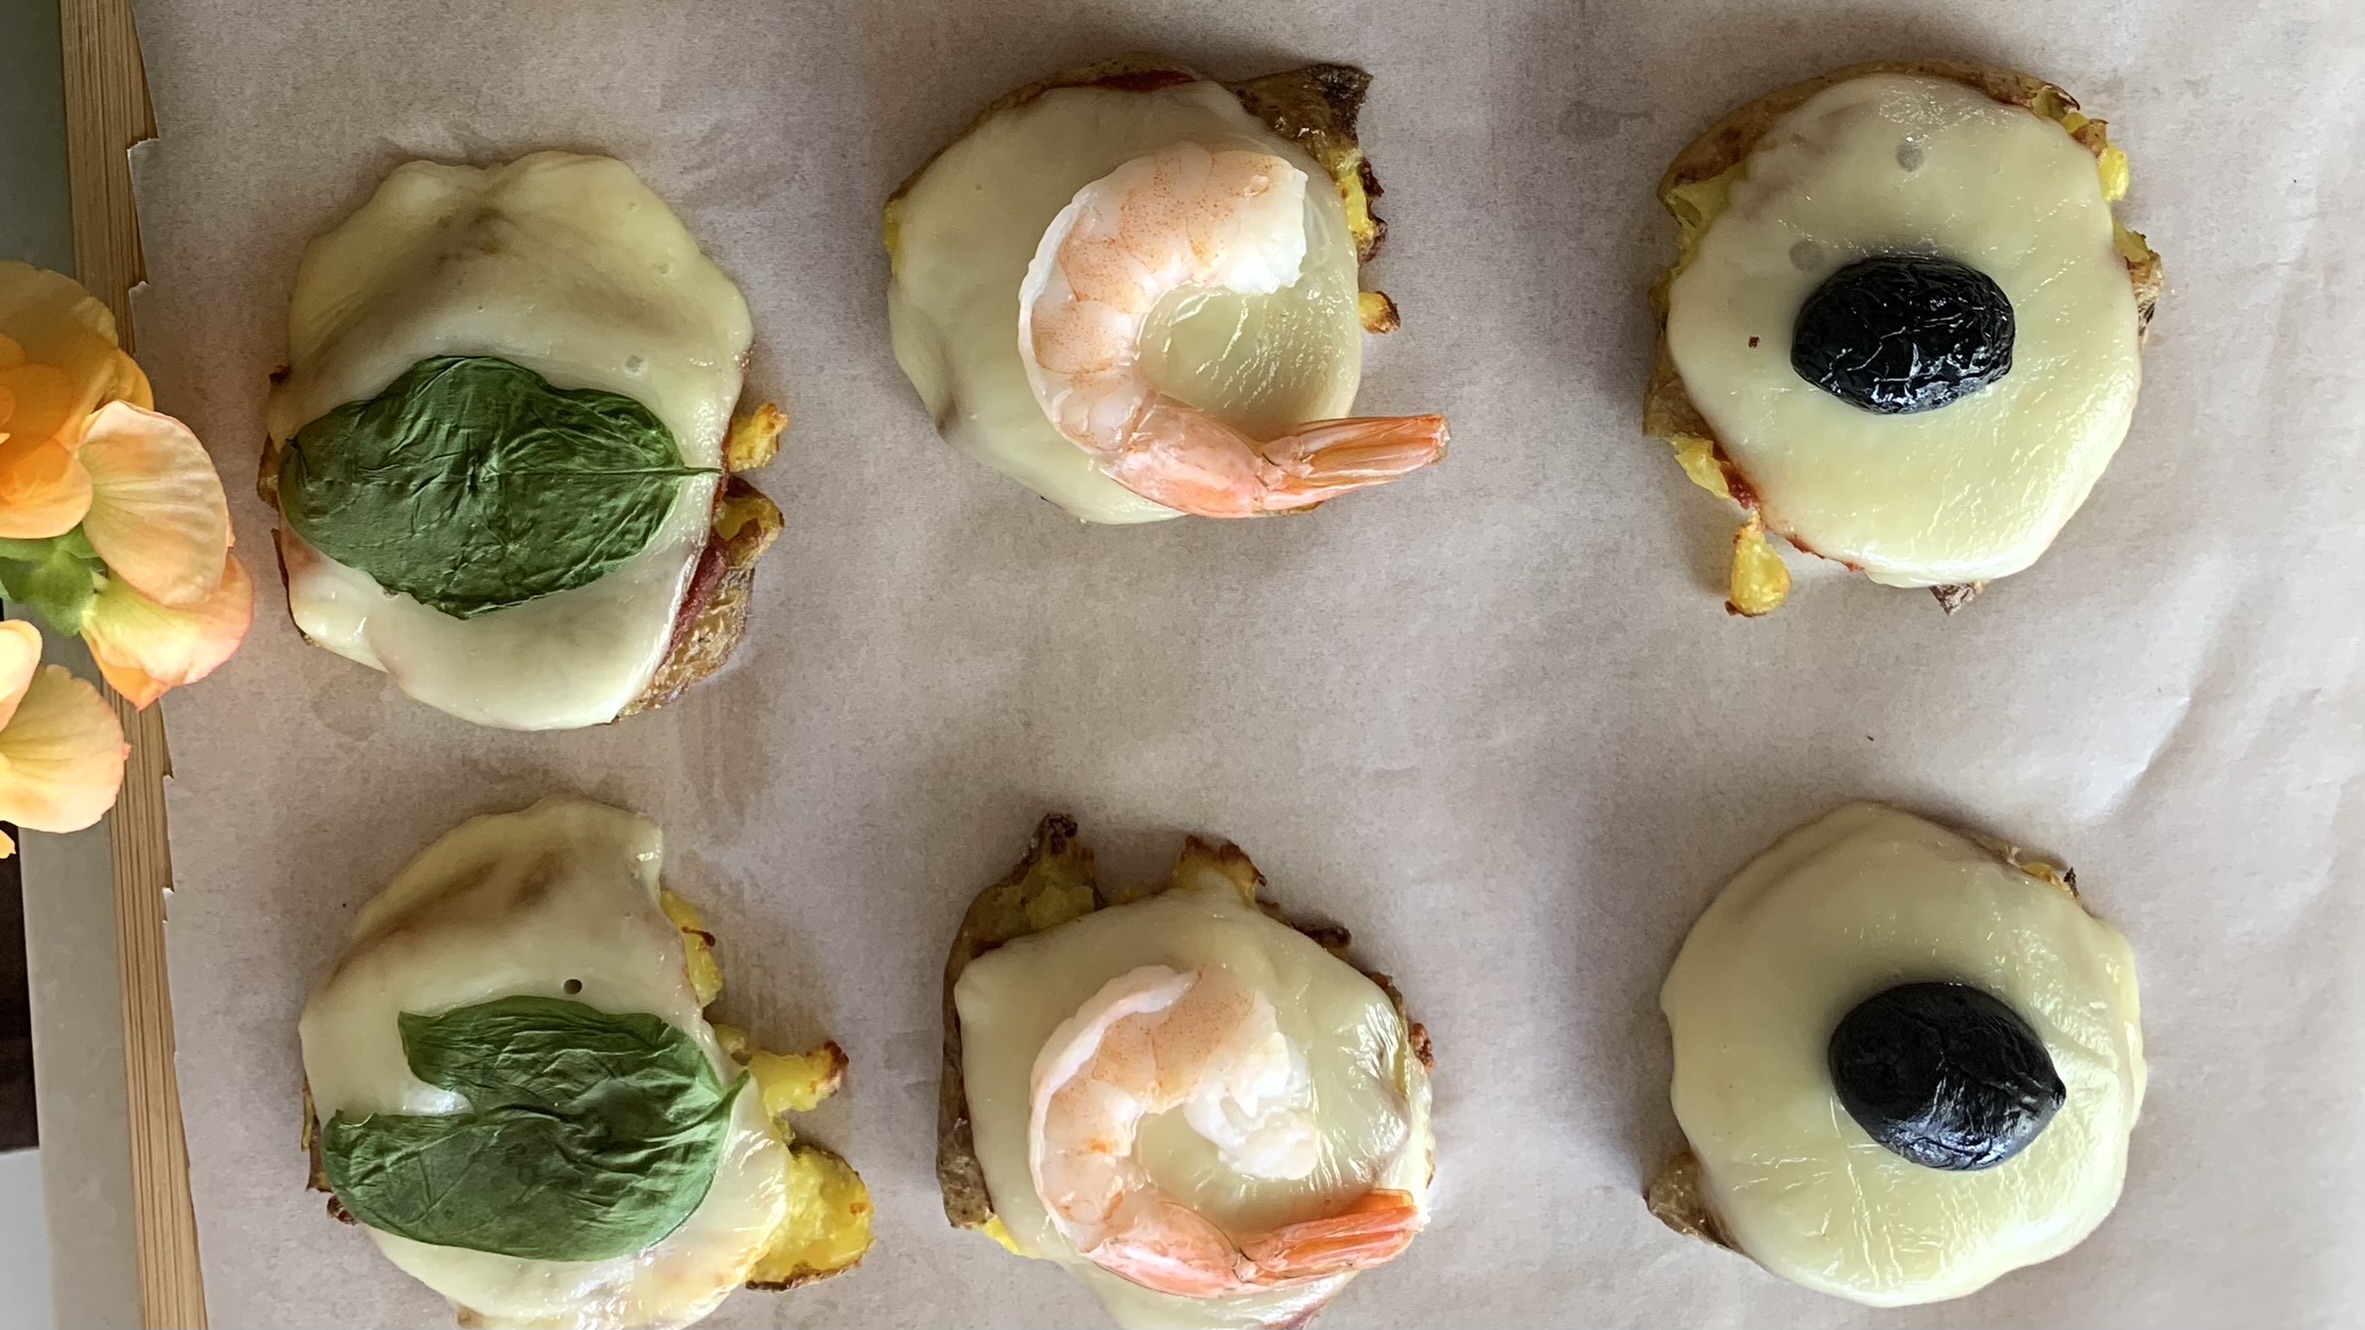
  6. Add a slice of fresh mozzarella cheese on top. If desired, top each mini potato pizza with garnishes of your preference such as basil leaves, shrimp, and black olives.
  7. Return the baking pan to the oven and broil quickly for about 5 minutes or until the cheese is melted.
  8. Enjoy while still warm and gooey.

Prep Time, Baking Information, and Servings:

  • Prep Time: 40 minutes
  • Baking Time: 25 minutes
  • Broiling Time: 5 minutes
  • Servings: 12

Nutritional Information (Per Serving):

  • Energy: 69 calories
  • Protein: 2.62 g
  • Fat: 4.16 g
  • Carbohydrates: 5.76 g
  • Fiber: 0.8 g

Storage and Particular Recommendations:

  • While these mini pizzas can be stored and reheated, they are best enjoyed when freshly made for optimal crispiness and flavor.
  •  Experiment with different toppings and garnishes to suit your taste preferences.
  •  The versatility of potatoes allows you to customize this recipe endlessly, making it perfect for any occasion!


Sugar Free Granola

Sugar Free Granola

Sugar Free Granola

This wholesome and nutritious granola recipe is a perfect choice for those looking for a healthier alternative to store-bought options. Instead of using butter, oil, or traditional sweeteners like maple syrup or honey, this recipe utilizes homemade applesauce as a natural binder. The result is a light and crunchy granola that’s both calorie-wise and packed with a variety of wholesome ingredients.

Oats are the main ingredient in this recipe, providing a rich source of fiber, protein, and essential nutrients like manganese and phosphorus. Oats support heart health and help maintain stable blood sugar levels. Combined with the natural sweetness of dried fruits and the crunch of nuts and seeds, this granola is not only delicious but also nourishing.

Enjoy this granola as a healthy breakfast or a snack option throughout the day. It’s easy to make and can be stored for up to a month, ensuring you have a tasty and nutritious option on hand whenever you need it.

This Sugar-Free Granola is a delightful way to start your day or keep your energy up between meals. With its natural sweetness and satisfying crunch, it’s bound to become your new favorite granola recipe!

Ingredients

  • 1 ½ cups rolled oats (120 g)
  • ¼ cup chopped almonds (35 g)
  • ¼ cup chopped walnuts (35 g)
  • ¼ cup pumpkin seeds (35 g)
  • ¼ cup pitted dates (50 g)
  • ¼ cup raisins (35 g)
  • ¼ cup dried cranberries (35 g)
  • 2 tbsp. applesauce (add by small quantities while stirring until the oats get sticky but not wet or saggy)

Directions

  1. Preheat your oven to 350°F (176°C) and line a baking sheet with parchment paper.
  2. In a large mixing bowl, combine the rolled oats, chopped walnuts, chopped almonds, and pumpkin seeds.
  3. Gradually add homemade applesauce, one tablespoon at a time, and use a fork (or your hands) to thoroughly incorporate it into the mixture. Add only small quantities while stirring until the oats get sticky but not wet or saggy.
  4. Transfer the granola mixture onto the prepared baking sheet. Spread it out evenly, ensuring a thin and even layer to allow for even cooking.
  5. Bake for approximately 30 minutes in total. After 15 minutes of baking, stir the granola thoroughly to prevent uneven browning. Return to the oven and bake for another 15 minutes.
  6. Remove the granola from the oven and immediately pour it over chopped dates, dried cranberries, and raisins. Mix well while the granola is still hot to get it sticky and naturally sweet.
  7. Once cooled, transfer the granola into a clean glass container.

Prep Time and Servings

  • Makes: 10 Servings
  • Prep Time: 30 minutes
  • Baking Time: 30 minutes

Nutritional Information (Per 1 Serving)

  • Energy: 147 calories
  • Protein: 4.58 g
  • Fat: 6.66 g
  • Carbohydrates: 19.45 g
  • Fiber: 2.9 g

Storage and Recommendations

  • Store your granola in an airtight container in the fridge for up to 1 month for optimal freshness.
  • Enjoy this crunchy and healthy treat as a nutritious breakfast or snack option.


1 Ingredient Applesauce

1 Ingredient Applesauce

1 Ingredient Applesauce

This super-simple applesauce, made with just one ingredient—apples—boasts a pure and wholesome flavor that highlights the natural sweetness of the fruit. It’s a versatile and healthy treat that you can easily customize by using different apple varieties or adding spices like cinnamon, star anise, or nutmeg for extra flavor. Whether enjoyed on its own, as a topping for pancakes or yogurt, or incorporated into your favorite recipes, this applesauce is sure to become a kitchen staple.

Apples are the star ingredient, offering a wealth of health benefits. They are rich in dietary fiber, which supports digestion, and they provide a good source of vitamin C, which boosts the immune system. Apples are also low in calories and contain natural sugars that provide a gentle energy boost without the crash associated with refined sugars. Making your own applesauce allows you to enjoy these benefits without any added preservatives or sweeteners.

This 1 Ingredient Applesauce is a simple and delicious way to enjoy the natural sweetness of apples. Whether you prefer it plain or spiced up, it’s a healthy treat that everyone will love!

Ingredients

  • 1 kg honeycrisp apples (or other apple type of your choice)

Directions

  1. Clean the apples thoroughly and remove all the skin and seeds. Section the apples into large chunks.
  2. Instant Pot: Add the apple chunks to the basket part and close the lid. Steam for 10 minutes in the Instant Pot.
  3. Classic Steamer: Steam the apple chunks until tender, typically up to 20 minutes.
  4. Let the steamed apples cool down for a bit. Transfer them into a glass jar and use a hand blender to transform them into a smooth puree.
  5. Allow the jar of applesauce to cool down completely before refrigerating.
  6. Let the applesauce thicken in the fridge for at least 4 hours or overnight.
  7. Enjoy this homemade applesauce as a topping for your crepes and pancakes, or incorporate it into your favorite recipes as a substitute for refined sugar.

Prep Time and Servings

  • Makes: 10 Servings
  • Prep Time: 20 minutes
  • Fridge Time: 4 hours

Nutritional Information (Per 1 Serving)

  • Energy: 20 calories
  • Protein: 0.07 g
  • Fat: 0.04 g
  • Carbohydrates: 4.51 g
  • Fiber: 0.4 g

Storage and Recommendations

  • Store your freshly made homemade applesauce in the refrigerator for up to a week.
  • Experiment with different apple varieties and spices to customize the flavor to your liking.


Applesauce Pancakes

Applesauce Pancakes

Applesauce Pancakes

These light, fluffy, and naturally sweet pancakes are a perfect choice for those looking for a diet-friendly recipe or sticking to a healthy eating plan without compromising on taste. The recipe combines mainly three wholesome ingredients—oat flour, eggs, and homemade applesauce—for an absolutely amazing and naturally sweet taste.

Homemade applesauce provides a natural and fruity source of sweetness, eliminating the need for added sugars. Paired with oat flour, which is prepared from rolled oats, these pancakes are rich in fiber, protein, and other important nutrients. Oat flour offers the benefits of whole grains, helping to support heart health and maintain steady energy levels throughout the day.

These Applesauce Pancakes are a fantastic way to enjoy a healthy and delicious breakfast. With their natural sweetness and satisfying texture, they’re sure to become a favorite in your morning routine! ​

Ingredients

  • 1 ¼ cups (100 g) oat flour (by blending rolled oats)
  • 1 egg
  • ½ cup homemade applesauce (If needed, add 1 or 2 tbsp. of applesauce to get the right batter thickness)
  • ½ tbsp. baking powder
  • ½ tsp. vanilla extract

Directions

  1. In a mixing bowl, combine oat flour, egg, homemade applesauce, baking powder, and vanilla extract. Stir until well combined. If the batter is too thick, add 1 or 2 tablespoons of applesauce to achieve the desired consistency.
  2. Preheat a non-stick pan over medium heat. Lightly grease the surface with a fraction of oil.
  3. Pour about ¼ cup of batter onto the heated griddle for each pancake. Cook until bubbles form on the surface of the pancake and the edges begin to look set, about 2-3 minutes.
  4. Carefully flip the pancakes with a spatula and cook for an additional 1-2 minutes, or until golden brown and cooked through.
  5. Serve warm, optionally top with your favorite toppings such as fresh fruit, yogurt, honey, or maple syrup.

Prep Time and Servings

  • Makes: 5 Servings
  • Prep Time: 15 minutes
  • Pan Cooking Time: 30 minutes

Nutritional Information (Per 1 Serving)

  • Energy: 105 calories
  • Protein: 4.68 g
  • Fat: 2.36 g
  • Carbohydrates: 16.83 g
  • Fiber: 2.4 g

Storage and Recommendations

  • Store any leftover pancakes in an airtight container in the refrigerator for up to 3 days. Reheat before serving if desired.
  • For the toppings, you can keep it calorie-wise by using applesauce and cinnamon like here, or serve with your favorite toppings!


Tuna Spring Roll

Tuna Spring Roll

Tuna Spring Roll

Whether you’re on a weight loss journey or seeking filling, healthy, and low-calorie recipe ideas, these seasoned canned tuna and veggie spring rolls are the perfect inspiration. These rolls are not only light and satisfying but also packed with protein and essential nutrients, making them ideal for a healthy lunch or dinner.

Tuna is the star ingredient in these spring rolls, providing a rich source of lean protein, omega-3 fatty acids, and vital vitamins and minerals such as vitamin D and selenium. Choosing water-packed canned tuna keeps the calorie count low, making it an excellent option for those looking to maintain a balanced diet while enjoying delicious meals. Paired with fresh vegetables and wrapped in rice paper, these spring rolls are a perfect combination of flavor and nutrition.

These spring rolls are versatile and can be enjoyed as a light meal or snack, especially during the warmer months of spring and summer. They’re not only delicious but also easy to customize with your favorite vegetables and seasonings.

These Tuna Spring Rolls are a delicious and healthy way to enjoy a light meal packed with protein and fresh vegetables. Perfect for spring and summer, they are sure to become a favorite in your meal rotation!

Ingredients

For the Tuna Part:

  • 2 canned tuna (drained, 240 g) in water
  • ¼ cup 14% fat sour cream
  • 1 tbsp. olive oil
  • 35 g pickles
  • ¼ tsp. salt
  • ¼ tsp. garlic powder
  • ¼ tsp. onion powder
  • ½ tsp. Tabasco sauce
  • Black pepper to taste

For the Rolls Part:

  • 6 Vietnamese rice papers
  • 100 g red and orange pepper
  • 12 leaves or 105 g lettuce
  • 50 g sliced carrots
  • 40 g green onion

For the Dipping Sauce:

  • ⅓ cup water
  • 2 tbsp. fish sauce
  • 2 tbsp. rice vinegar
  • 1 tbsp. maple syrup
  • 30 g shredded carrots
  • 1 minced garlic clove
  • ½ tsp. chili flakes

Directions

  1. In a bowl, combine drained canned tuna, sour cream, olive oil, diced pickles, garlic powder, onion powder, Tabasco sauce, salt, and black pepper. Mix well and set aside.
  2. Thinly slice carrots, onion, and orange pepper. Clean and drain lettuce leaves.
  3. In a small bowl, mix water, fish sauce, rice vinegar, maple syrup, shredded carrots, minced garlic clove, and chili flakes. Set the dipping sauce aside to infuse the flavors.
  4. Dip one spring roll rice paper into a large bowl of cold water to soften. Lay the softened wrap onto a working board. Add ingredients in layers: orange pepper or carrot slices, lettuce leaves, tuna mixture, and slices of carrot, pepper, and onion. Fold the sides of the wrap and roll it to create the typical spring roll shape. Repeat until all the mixture is used.
  5. Let the spring rolls rest in the fridge for about half an hour to allow the flavors to meld together.
  6. Serve with the homemade dipping sauce.

Prep Time and Servings

  • Makes: 6 Servings
  • Prep Time: 30 minutes

Nutritional Information (Per 1 Serving)

  • Energy: 100 calories
  • Protein: 9.16 g
  • Fat: 3.99 g
  • Carbohydrates: 7.57 g
  • Fiber: 1 g

Storage and Recommendations

  • Serve the spring rolls fresh for optimal flavor and texture or store them for up to 1 day.
  • Customize the fillings according to your preferences.
  • Ensure you select a canned tuna brand that guarantees a product from wild and healthy tuna species to avoid higher levels of mercury.