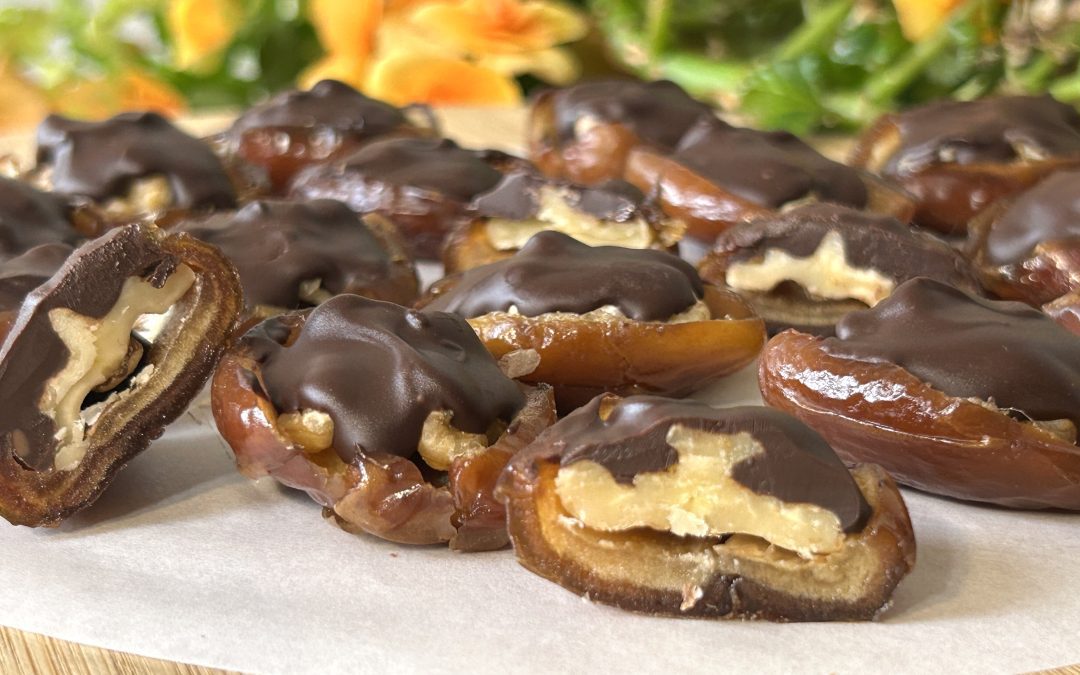
Chia Seed Tiramisu

Chia Seed Tiramisu

Chia Seed Tiramisu

This chia seed tiramisu is a delightful fusion of creamy, coffee-infused goodness and wholesome ingredients that will satisfy your sweet cravings while fueling your body. Perfect for breakfast, a midday pick-me-up, or an after-dinner treat, this recipe brings together the rich flavors of coffee and cocoa with the health benefits of chia seeds.

Unlike traditional tiramisu, which is loaded with refined sugar and heavy dairy, this version is naturally sweetened, packed with protein, and full of fiber to keep you feeling satisfied.

Chia seeds, the star ingredient of this recipe, are tiny nutritional powerhouses that deserve a regular spot in your diet. They are packed with fiber, plant-based protein, and essential omega-3 fatty acids that support heart health, brain function, and digestion. Thanks to their incredible ability to absorb liquid, they create a pudding-like consistency that’s both creamy and satisfying. Plus, their slow-digesting nature helps stabilize blood sugar levels, making them a fantastic choice for sustained energy throughout the day.

Whether you’re looking for a nutritious breakfast option or a wholesome dessert, this chia seed tiramisu is a guilt-free way to enjoy a classic favorite with a nourishing twist.

Ingredients:

  • 1 tbsp. instant coffee
  • 1 tbsp. hot water
  • 2 tbsp. maple syrup
  • 1 ½ cups (300 g) Greek yogurt
  • 3 tbsp. (30 g) chia seeds
  • 3 tbsp. maple syrup
  • ¼ tsp. vanilla extract (optional)
  • ½ tsp. cocoa powder

Directions:

  1. Prepare the whipped coffee: In a glass, combine instant coffee, hot water, and maple syrup.
  2. Use a hand mixer to whisk the mixture until it becomes thick, creamy, and light in texture.
  3. Place the whipped coffee in the fridge while preparing the chia mixture.
  4. In a mixing bowl, add Greek yogurt, chia seeds, maple syrup, and vanilla extract.
  5. Stir the mixture well to ensure the chia seeds are evenly distributed.
  6. Gently fold in the whipped coffee, mixing until fully incorporated.
  7. Pour the chia mixture into small jars or cups, filling them to the top.
  8. Lightly sprinkle cocoa powder over each serving for a tiramisu-like finish.
  9. Cover the jars with lids or plastic wrap and refrigerate for at least 2 hours (overnight for the best texture).
  10. Serve chilled and enjoy the creamy, coffee-infused delight!

Prep Time: 15 minutes
Chill Time: 2 hours in the fridge
Servings: 3

Nutritional Information (Per Serving):

  • Energy: 197 calories
  • Protein: 5.2 g
  • Fat: 6.38 g
  • Carbohydrates: 31.39 g
  • Fiber: 3.5 g

Storage:

  • Store in airtight jars or covered cups in the fridge for up to 3 days.
  • For a thicker texture, let it sit overnight.
  • Great as a make-ahead dessert or even a nutritious breakfast option!


Wholesome Carrot Cake

Wholesome Carrot Cake

Wholesome Carrot Cake

There’s something about homemade cake that just feels like a warm hug, and this Wholesome Carrot Cake is exactly that, comforting, nourishing, and utterly delicious. Whether you’re making it as a heartfelt Valentine’s Day treat, a birthday surprise, or just because you’re craving something sweet yet nutritious, this cake will hit the spot.

Now, I know Valentine’s Day is all about chocolate, but hear me out, this carrot cake, naturally sweetened with dates and topped with a dreamy maple cream cheese frosting, is an unexpected star of any celebration. It’s moist, subtly spiced, and has that rich depth of flavor from the oats and carrots that makes every bite feel like pure indulgence. And the best part? It’s gluten-free, refined sugar-free, and packed with nutrients that love your body back!

Let’s talk about carrots, the shining star of this cake. Beyond adding natural sweetness and beautiful color, they are a powerhouse of beta-carotene, an antioxidant that converts into vitamin A in your body. This means better vision, a stronger immune system, and radiant skin, all great reasons to sneak more carrots into your diet! Plus, their fiber content keeps your digestion happy, and they work beautifully in baked goods to keep them moist and flavorful. Pair them with oats, another hero ingredient in this cake, and you’ve got a dessert that’s as nourishing as it is delicious.

So, if you’re looking for a treat that feels indulgent but is made with real, wholesome ingredients, this is it. Whether you’re baking for yourself, a loved one, or your entire family, this Wholesome Carrot Cake is a sweet way to show love. Now, let’s get baking!

Ingredients
200 ml hot milk
120 g pitted dates
1 cup (80 g) oat flour (made from rolled oats)
¾ cup (60 g) rolled oats
1 tsp. baking powder
½ tsp. cinnamon powder
½ tsp. pumpkin pie spice
Pinch of salt (optional)
2 eggs
4 tbsp. olive oil
200 g finely shredded carrots
100 g cream cheese
3 tbsp. maple syrup
2 tbsp. milk
30 g walnut halves

Directions

  •  In a bowl, combine oat flour, rolled oats, baking powder, cinnamon, pumpkin spice, and salt (if using). Set aside.
  • Soak the pitted dates in hot milk for 15 minutes until they soften.
  • Puree the softened dates with milk until smooth and creamy.
  • In a mixing bowl, whisk the blended dates with eggs and olive oil until well incorporated.
  • Add the dry mixture to the wet ingredients and stir until fully combined.
  • Gently mix in the finely shredded carrots to ensure an even distribution.
  • Pour the batter into a lined 18 × 18 cm baking pan and bake at 350°F (180°C) for 40 minutes.
  • While the cake bakes, blend cream cheese, maple syrup, and milk until smooth and creamy.
  • Let the cake cool completely, then spread the frosting evenly over the top.
  • Top with walnut halves and chill for at least 1 hour before serving.

Prep & Baking Information
Servings: 9
Prep Time: 30 minutes
Baking Time: 40 minutes
Chilling Time: 1 hour

Nutritional Information (Per Serving)
Energy: 261 calories
Protein: 6.78 g
Fat: 13.87 g
Carbohydrates: 29.64 g
Fiber: 3.7 g

Storage & Tips

  • Store in an airtight container in the refrigerator for up to 5 days
  • Best enjoyed chilled for a firmer, creamier texture
  • For a sweeter cake, increase the number of dates or drizzle extra maple syrup over the frosting

Walnut Heart Biscuits

Walnut Heart Biscuits

Walnut Heart Biscuits

There’s something magical about homemade treats, especially when they come in the shape of a heart. Whether you’re celebrating Valentine’s Day, an anniversary, a birthday, or simply want to surprise someone special, these walnut heart biscuits are a heartfelt way to say, “I care.” They’re a little nutty, slightly sweet, and melt-in-your-mouth delicious with a drizzle of dark chocolate, because, let’s be honest, chocolate makes everything better.

But here’s the best part: these biscuits aren’t just about indulgence; they’re about nourishment, too! Walnuts take center stage in this recipe, bringing their rich, buttery texture and powerhouse nutrients to the mix. Packed with brain-boosting omega-3 fatty acids, antioxidants, and essential minerals like magnesium and copper, walnuts are a true superfood. They support heart health, enhance cognitive function, and even help reduce inflammation.

If you’re looking for a reason to incorporate walnuts into your daily routine, this is it! Whether you toss them into smoothies, sprinkle them on salads, or bake them into wholesome treats like these biscuits, walnuts deserve a spot in your kitchen.

Now, let’s get baking!

Ingredients:

  • 150 g raw walnuts
  • 3 tbsp. maple syrup
  • 50 g dark chocolate hearts (optional)
  • 10 g dark chocolate, melted (optional)

Directions:

  1. Grind the raw walnuts in a coffee grinder or nut grinder using the pulse mode. Be careful not to over-process, as this will turn them oily; you want a fine flour consistency.
  2. Transfer the ground walnuts to a bowl and mix in the maple syrup. Stir with a spatula until a cohesive dough forms.
  3. If needed, refrigerate the dough for 15 minutes to help it firm up.
  4. Preheat the oven to 350°F (180°C) and line a baking sheet with parchment paper.
  5. Take a tablespoon of dough and press it into a heart-shaped biscuit cutter on the prepared baking sheet. Gently press to shape.
  6. Repeat until all the dough is used, arranging the hearts neatly on the sheet.
  7. Bake for 12–15 minutes, or until the biscuits are set and lightly golden.
  8. Let them cool completely before handling, as they firm up during cooling.
  9. If adding chocolate, drizzle a small amount onto each biscuit and press a dark chocolate heart onto it while still melted.
  10. Transfer the biscuits to the fridge for 30 minutes to allow the chocolate to set.

Prep & Baking Time:

  • Prep: 20 minutes
  • Baking: 20 minutes
  • Chilling (if adding chocolate): 30 minutes
  • Servings: 10 biscuits

Nutritional Information (Per Biscuit):

  • Energy: 150 calories
  • Protein: 2.75 g
  • Fat: 12.34 g
  • Carbohydrates: 8.83 g
  • Fiber: 1.7 g

Storage Tips:

  • Store at room temperature in an airtight container for up to 3 days.
  • Refrigerate for up to 1 week.
  • Freeze for up to 3 months in a sealed bag or container.

Notes:

  • You can swap maple syrup for honey if you prefer.
  • Try using different nut flours (like almonds or pecans) for a variation on flavor.
Apple & Cocoa Brownies

Apple & Cocoa Brownies

Apple & Cocoa Brownies

If you’re craving something rich, chocolatey, and indulgent but don’t want to feel weighed down by refined sugars and flours, these apple & cocoa brownies are about to become your new favorite treat. I was skeptical at first—how can brownies without flour still be fudgy? But trust me, these turned out so unbelievably soft, moist, and packed with deep chocolate flavor that I knew I had to share them.

The magic here is the apples. Fresh, naturally sweet, and full of fiber, apples replace the need for added sugars while keeping the brownies moist. When blended with cocoa powder and eggs, they create a silky batter that bakes into the most decadent texture. I like to add a handful of dark chocolate chips on top because, let’s be real, more chocolate is always a good idea.

Now, let’s talk about why apples deserve a prime spot in your diet. They’re loaded with fiber, which supports digestion and helps regulate blood sugar, perfect for keeping energy levels stable throughout the day. They’re also packed with antioxidants, especially in the skin, which fight inflammation and support heart health. And here’s the best part: apples naturally enhance iron absorption, making them a great addition to a diet focused on maintaining healthy iron levels. So, if you’ve been looking for a way to satisfy your sweet tooth while nourishing your body, these brownies check all the boxes.

These brownies are a delicious way to sneak more fruit into your day while still feeling like you’re indulging in a chocolatey treat. Give them a try and let me know how they turn out!

Ingredients:

  • 75 g pitted dates (optional)
  • 570 g (4 large) apples, peeled, cored, and chopped
  • 30 g cocoa powder
  • 3 eggs
  • 1 tsp. baking powder
  • 30 g dark chocolate chips (optional)

Directions:

  1. If using dates, soak them in a bowl with hot water for 10–15 minutes until softened.
  2. Meanwhile, peel, core, and chop the apples into small pieces.
  3. Add the softened dates, cocoa powder, chopped apples, and eggs to a bowl. Blend everything with a hand blender (or a food processor) until smooth.
  4. Stir in the baking powder, making sure it’s evenly incorporated.
  5. Grease a 7 x 7-inch (18 x 18 cm) baking pan with coconut oil and line it with parchment paper.
  6. Pour the batter into the prepared pan, spreading it evenly.
  7. Sprinkle dark chocolate chips on top for extra richness.
  8. Preheat the oven to 350°F (180°C) and bake for 40–45 minutes, or until the top looks dry and the brownies hold together.
  9. Let the brownies cool completely in the pan.
  10. For a denser texture, refrigerate for at least 2 hours before serving.

Prep & Baking Time:

  • Prep time: 30 minutes
  • Baking time: 45 minutes
  • Servings: 9

Nutritional Information (Per Serving):

  • Calories: 110
  • Protein: 3.25 g
  • Fat: 3.22 g
  • Carbohydrates: 18.64 g
  • Fiber: 2.1 g

Storage Tips:

  • Store in an airtight container in the fridge for up to 5 days for a firmer, fudgier texture.
  • Enjoy chilled for a richer taste or warm slightly for a gooier texture.
  • If you prefer a less sweet brownie, you can skip the dates.

Dietary Information:

  • Flourless
  • Naturally sweetened
  • Gluten-free


Almond Flour Muffins

Almond Flour Muffins

Almond Flour Muffins

There’s something so comforting about a warm, homemade muffin, especially when it’s soft, buttery, and just the right amount of sweet. These almond flour muffins are inspired by frangipane, the rich almond-based filling often used in French pastries. Traditionally, frangipane is creamy and indulgent, but today, we’re transforming that luxurious texture into a wholesome, gluten-free treat that’s naturally sweetened with maple syrup.

The moment you take a bite, you’ll notice how incredibly moist these muffins are thank you, thanks to the almond flour! Unlike traditional wheat flour, almond flour is naturally rich in healthy fats, giving these muffins an unbeatable softness. Plus, we’re adding a little touch of dried fruit (optional, of course) to bring in some tartness that perfectly complements the subtle sweetness of maple syrup.

But let’s talk about almond flour, the star ingredient here. Not only does it create an amazing texture, but it’s also packed with protein, vitamin E, and heart-healthy monounsaturated fats. These nutrients help support brain function, reduce inflammation, and keep your skin glowing. Plus, almond flour is naturally gluten-free and low in carbohydrates, making it a fantastic alternative for those looking to reduce their grain intake. Including almonds in your diet can help maintain steady blood sugar levels, making these muffins a great option for breakfast or a midday snack without the usual sugar crash. If you’re not already using almond flour in your baking, this recipe is a perfect excuse to start!

So, whether you need a quick energy boost, a lunchbox treat, or just a cozy afternoon snack, these almond flour muffins have got you covered. Now, let’s get baking!

Ingredients:

  • 4 tbsp. (60 g) soft butter
  • 1/4 cup (60 ml) maple syrup
  • 2 eggs
  • 125 g almond flour
  • 1/2 tbsp. baking powder
  • 7 g vanilla sugar or 1 tsp. vanilla extract
  • 30 g dried cranberries (optional)

Directions:

  1. Preheat your oven to 350°F (180°C). Lightly grease a muffin pan with oil (coconut oil works great for this).
  2. In a large mixing bowl, combine the soft butter and maple syrup. Whisk vigorously until smooth and creamy (an electric whisk can help!).
  3. Add the eggs one at a time, mixing well after each addition to fully incorporate them.
  4. Gently fold in the almond flour, baking powder, and vanilla sugar. Stir until the batter is smooth and light.
  5. If using dried cranberries, fold them in gently.
  6. Spoon or scoop the batter evenly into the muffin pan, filling each cup about two-thirds full.
  7. Bake for 25 minutes, or until a toothpick inserted into the center comes out clean.
  8. Once baked, remove the muffins from the oven and let them cool on a wire rack before serving.

Prep Time: 20 minutes
Baking Time: 25 minutes
Servings: 7 muffins

Nutritional Information (Per Muffin):

  • Energy: 235 calories
  • Protein: 5.7 g
  • Fat: 17.76 g
  • Carbohydrates: 16.02 g
  • Fiber: 2 g

Storage Tips:

  • Store in an airtight container at room temperature for up to 3 days.
  • For longer storage, refrigerate for up to 1 week or freeze for up to 3 months.
  • Feel free to customize with different dried fruits, nuts, or even a pinch of cinnamon for extra flavor.